Embroidery has long been cherished as a timeless craft, allowing individuals to express their creativity through delicate needlework.
Among the various embroidery techniques, the faggoting stitch stands out for its elegance and versatility.
In this comprehensive guide, we will delve into the world of faggoting stitch embroidery – how to sew, equipping you with the knowledge and skills to create stunning and intricate designs.
Whether you are a seasoned sewing enthusiast or a beginner eager to explore the realm of embroidery, this guide will serve as your trusted companion. We will start by unraveling the history and significance of the faggoting stitch, tracing its origins and evolution throughout the ages.
By the end of this guide, you will have the confidence to incorporate faggoting stitch embroidery into your projects, adding a touch of elegance and sophistication to your creations.
Let’s embark on this enchanting sewing adventure together.

Faggoting Stitch Embroidery: How to Sew? 10 Steps
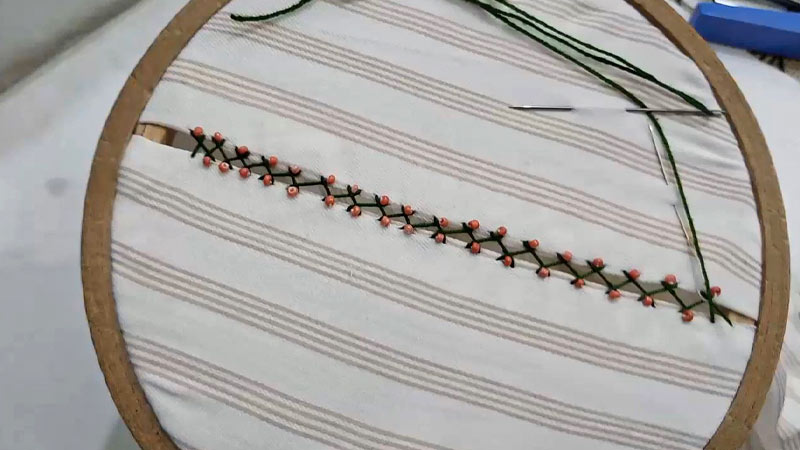
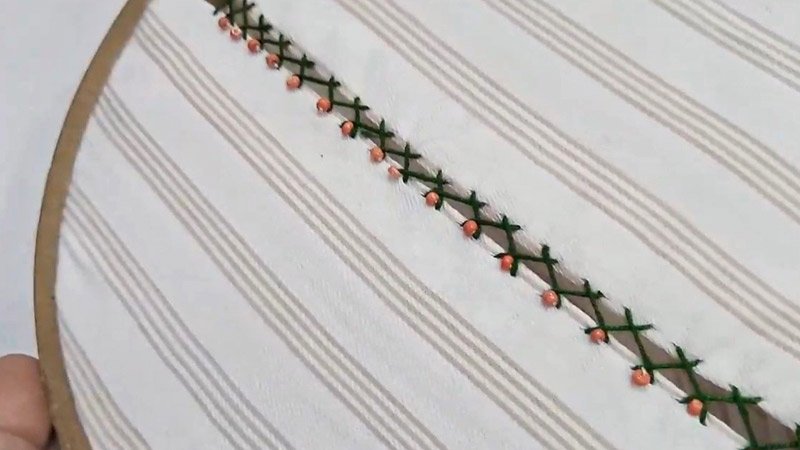
Faggoting stitch embroidery is a beautiful technique that adds a delicate and decorative touch to the fabric.
It involves creating a series of parallel stitches that are then joined together with connecting stitches. Here’s a step-by-step guide on how to sew the faggoting stitch embroidery:
Materials Needed
Fabric of your choice, embroidery hoop, embroidery needle, embroidery floss or thread, scissors, and a marking tool (optional).
Step 1: Prepare Your Fabric
Start by preparing your fabric. Cut it to the desired size and make sure it is clean and free from any wrinkles. If needed, you can use an iron to press the fabric.
Step 2: Secure the Fabric in an Embroidery Hoop
Place the fabric in an embroidery hoop, making sure it is taut and evenly stretched. This will help you maintain consistent tension while stitching.
Step 3: Choose Your Floss or Thread
Select the embroidery floss or thread that you want to use for your faggoting stitch embroidery. You can choose a color that complements your fabric or opt for a contrasting color for a more striking effect.
Step 4: Mark the Stitch Lines (Optional)
If you prefer, you can mark the stitch lines on your fabric using a marking tool. This will help you maintain straight and even stitches. However, if you’re comfortable stitching without markings, you can skip this step.
Step 5: Start Stitching

Thread your embroidery needle with the chosen floss or thread. Begin by bringing the needle up from the back of the fabric at one end of the stitch line.
Leave a small tail of thread at the back for securing later.
Step 6: Create the Parallel Stitches
Make a straight stitch across the stitch line, going from one side to the other. The length of the stitch can vary depending on your preference, but it’s typically around 1/4 to 1/2 inch long.
Repeat this step to create parallel stitches along the entire stitch line, leaving an equal gap between each stitch.
Step 7: Connect the Stitches
To connect the parallel stitches, bring the needle up from the back of the fabric at one end of the stitch line.
Pass the needle under the first stitch, then bring it up through the gap between the first and second stitches.
Continue this process, passing the needle under each stitch and bringing it up through the gap until you reach the end of the stitch line.
Step 8: Secure the Thread
Once you’ve reached the end of the stitch line, secure the thread by making a small knot at the back of the fabric. Trim any excess thread.
Step 9: Repeat the Process
If desired, you can create additional stitch lines parallel to the first one, following the same steps. Experiment with different stitch lengths and gaps to achieve different effects.
Step 10: Finishing Touches
Once you’ve completed your faggoting stitch embroidery, remove the fabric from the embroidery hoop and give it a final press with an iron if needed.
You can then incorporate the embroidered fabric into your desired project, such as a garment, home decor item, or accessory.
Remember, practice makes perfect, so don’t be discouraged if your first attempts are not flawless. With time and patience, you’ll be able to master the faggoting stitch embroidery technique and create stunning designs.
What Is a Fagoting Stitch Used For?

A fagoting stitch is a decorative sewing technique used to join two pieces of fabric with a narrow gap in between.
It’s primarily used for decorative purposes, such as adding embellishments to clothing, creating openwork designs, or joining lace inserts to fabric.
Fagoting stitches can enhance the aesthetics of garments, table linens, and other fabric items by creating a lacy, airy effect. Here are the details:
Decorative Embellishments
Fagoting stitches are often used in fashion design to create decorative seams, add lace or ribbon inserts, or join fabric panels with an elegant, openwork appearance.
They are commonly found in lingerie and intimate apparel to create delicate and feminine details.
Textile Art
Fagoting stitches can be employed in making decorative pillow covers, curtains, and tablecloths, adding a touch of sophistication to home textiles.
Crafters use this stitch for adding artistic elements to quilts, wall hangings, and other textile art projects.
Bridal and Special Occasion Attire
Fagoting stitches can be used to attach lace appliqués, create beautiful seams, or add ornate details to bridal gowns and bridesmaid dresses.
They are also utilized in designing formal eveningwear for special occasions.
Heirloom Sewing
Fagoting stitches are common in heirloom sewing, particularly in the creation of christening gowns and baby clothes. These stitches are used to replicate the intricate detailing seen in vintage and antique garments.
Handmade Gifts
Crafting personalized handkerchiefs with fagoting stitches can make thoughtful gifts for loved ones. They can be applied to scarves, shawls, and handbags, adding a bespoke touch.
Embroidery Complement
Fagoting stitches can complement embroidery work by providing a delicate border or transition between different embroidered elements.
In summary, the fagoting stitch is a versatile technique primarily employed for decorative purposes in sewing and textile arts.
Its applications range from enhancing clothing and textile art to creating unique, personalized gifts and heirloom-quality items.
What Are Other Decorative Stitches?
There are numerous decorative stitches used in sewing and embroidery to add flair and embellishment to fabric. Here are some popular ones:
Satin Stitch

A dense, smooth stitch that covers a solid area with a glossy finish. It’s often used for lettering and creating bold, colorful designs.
French Knot
A small, textured knot stitch that adds dimension and detail to embroidery, often used for eyes, flower centers, and other accents.
Chain Stitch
A looped stitch that creates a chain-like pattern. It can be used for outlines, borders, and filling shapes.
Blanket Stitch
Typically used for edging fabric, it creates a decorative, scalloped border and is also handy for appliqué.
Running Stitch
A simple, straight stitch that can be used decoratively when done in patterns or varying lengths.
Cross Stitch
Involves two diagonal stitches crossing each other to form an “X.” It’s a popular technique for creating intricate, pixelated designs.
Herringbone Stitch
This stitch creates a zigzag pattern and can be used for decorative borders and filling areas.
Couching
Involves stitching one thread or yarn over another, often used to attach decorative threads or fibers to the fabric’s surface.
Bullion Knot
A long, cylindrical knot stitch that adds texture and dimension, commonly used for floral elements and embroidery accents.
Lazy Daisy Stitch
Creates single or multiple petal-shaped loops, ideal for forming flower petals and leaves.
Buttonhole Stitch
Often used to create secure edges for buttonholes and also for decorative edging and embroidery.
Spider Web Stitch
Forms a radiating pattern that resembles a spider’s web, suitable for creating sunbursts and circular designs.
Fly Stitch
Makes a “Y” or “V” shape and is used for creating decorative borders and leaf motifs.
These decorative stitches offer a wide range of possibilities for adding texture, color, and artistic flair to your sewing and embroidery projects, whether you’re working on clothing, home decor, or textile art.
FAQs
What is fagoting embroidery, and how is it different from other embroidery techniques?
Fagoting embroidery is a decorative stitching technique that joins two pieces of fabric with a narrow gap in between, creating an openwork or lacy effect.
Fagoting involves stitching through existing fabric layers to connect them while leaving gaps.
What types of fabrics are suitable for fagoting embroidery?
Lightweight and semi-sheer fabrics work best for fagoting embroidery. Common choices include chiffon, organza, voile, and delicate cottons. These fabrics allow the openwork effect of fagoting to shine.
What are some common applications of fagoting embroidery?
Fagoting embroidery is often used in fashion design to create decorative seams, attach lace or ribbon inserts, or add intricate detailing to garments.
It’s also employed in creating heirloom-quality baby clothes and christening gowns.
What types of stitches are typically used in fagoting embroidery?
Fagoting can be achieved using various stitches, including herringbone, feather stitch, or simple running stitches.
These stitches securely join the fabric layers while allowing for the desired openwork effect.
Can fagoting embroidery be done by hand or machine?
Fagoting embroidery can be done both by hand and by machine. Hand embroidery allows for precise control and intricate detailing, while machine embroidery offers speed and consistency, making it suitable for larger projects and commercial production.
Conclusion
Faggoting stitch embroidery is a captivating technique that allows you to elevate your sewing projects to new heights. Throughout this guide, we have explored the history, tools, and techniques associated with this beautiful stitch.
Whether you choose to embellish garments, accessories, or home decor items, the faggoting stitch will add a touch of elegance and sophistication to your creations.
As you continue your sewing journey, don’t be afraid to experiment and explore new variations of the faggoting stitch. Adapt it to suit your unique style and vision, and let your creativity flourish.
With dedication and practice, you will soon become a master of faggoting stitch embroidery, impressing others with your skill, and creating cherished heirlooms that will be treasured for generations to come.
So, pick up your needle and thread, and let the enchantment of faggoting stitch embroidery guide you on your sewing adventures.
Leave a Reply