Stippling in sewing is a captivating and versatile technique that adds texture and visual interest to fabric projects.
It involves the creation of intricate patterns or designs through the use of closely spaced, small, and often irregular dots or stitches.
Stippling can be executed using various sewing methods, including machine sewing, hand stitching, or embroidery. This technique serves both practical and decorative purposes, making it a valuable skill in the world of textile arts.
For quilters, stippling is a means of securely fastening quilt layers together while enhancing the finished piece’s aesthetic appeal.
Additionally, stippling can be utilized in garment construction to add a unique tactile quality or to transform a plain fabric into something visually captivating.
In this exploration of what stippling is in sewing, we will delve into its functions, methods, and common mistakes, shedding light on the artistry and craftsmanship that make it a cherished sewing technique.

What Is Stippling In Sewing?
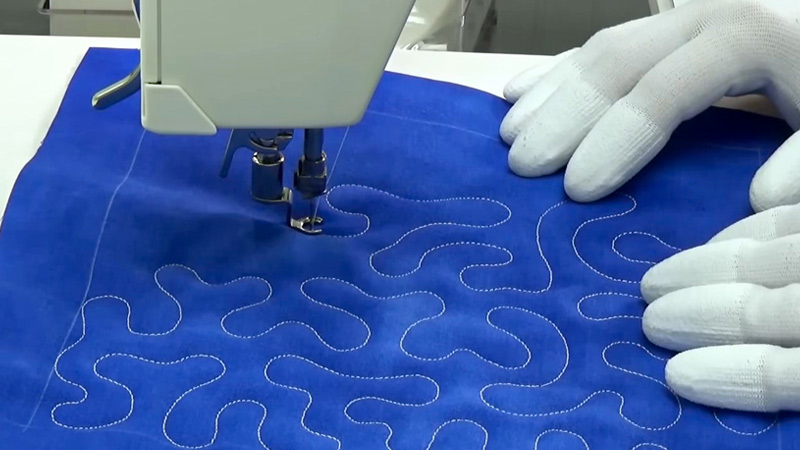
Stippling in sewing is a decorative technique that involves creating a pattern or design by sewing closely spaced, evenly spaced lines of small, often irregular, dots or stitches.
This technique is typically used for embellishing fabrics, quilts, and garments, adding texture and visual interest to the surface.
Stippling can be done using a variety of sewing machines, including free-motion quilting and embroidery machines, as well as by hand with a needle and thread.
The result is a delicate, intricate pattern ranging from simple geometric shapes to more complex, organic designs.
Stippling allows for creative expression in sewing projects and adds a unique and personalized touch to textiles.
It requires precision and patience, as achieving a consistent and visually appealing stippled design often takes practice and attention to detail.
Here are the functions of stippling in sewing:
Quilting

Stippling is a popular technique in quilting, where it serves the essential function of securing the layers of a quilt together. By sewing closely spaced stipple stitches across the surface, quilters prevent the batting and top fabric from shifting or bunching over time.
This ensures that the quilt retains its shape and durability while adding a decorative element.
Textural Interest
Stippling adds a unique texture to the fabric and enhances its tactile appeal. When used in garment construction, it can transform a plain piece of clothing into something visually intriguing and pleasant to touch.
This function is especially valuable when working with monochromatic or simple fabrics, as stippling can provide depth and interest.
Embellishment
Stippling can be an embellishment method, allowing sewers to create intricate patterns and designs on various textiles.
Whether it’s enhancing the visual appeal of a pillowcase or adding sophistication to a tablecloth, stippling enables creative expression and personalization.
Decorative Quilting

In addition to its practicality, stippling is often used purely for decorative purposes in quilting. Sewers can experiment with different stipple patterns to create visually stunning quilts.
This function allows for artistic freedom and customization, resulting in quilts that are not only warm but also visually captivating.
Camouflaging Imperfections
Stippling can be employed to conceal imperfections or stains on fabric. By creating a stipple pattern over a blemish or discoloration, you can effectively hide it, giving your project a polished appearance.
This function is particularly useful for upcycling or repairing clothing items.
Quilted Garments
Stippling is not limited to quilts; it can also be used on garments. Quilted jackets and vests often feature stippling to provide insulation and add a fashionable quilted texture. This function combines both style and function, making it a versatile choice for cold-weather clothing.
Customization and Personalization
Stippling allows for the personalization of sewing projects. By selecting specific stipple patterns, thread colors, and stitch densities, you can tailor the design to match your vision and preferences.
This function is especially valuable for crafters and artisans seeking to create unique pieces.
Stippling in sewing serves many functions, from practical uses like securing layers in quilting to enhancing the aesthetic appeal and texture of various fabric projects.
Its versatility and creative potential make stippling a valuable technique in sewing and textile arts.
How Do You Use A Stippling Template?

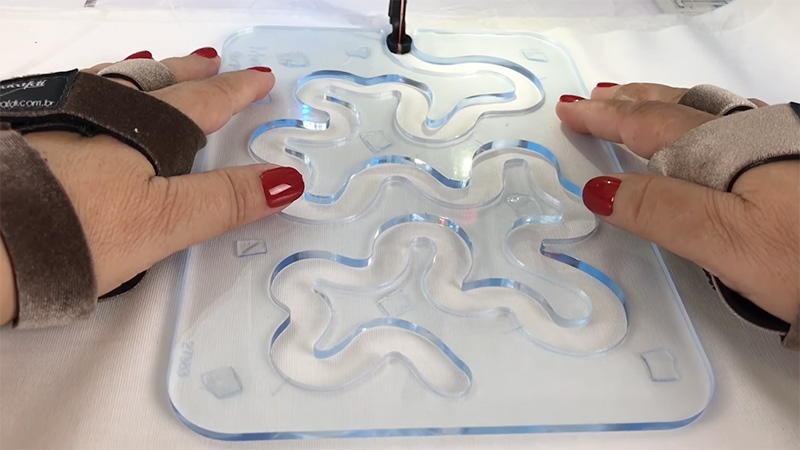
A stippling template can help you create consistent and intricate stipple patterns in your sewing or quilting projects.
Here are the simple methods for using a stippling template:
Prepare Your Workspace
Start by setting up your sewing or quilting workspace. Ensure your fabric is securely placed in your sewing machine’s hoop or frame and your thread and machine are ready for use.
Place the stippling template on top of your fabric in the desired position.
Secure the Template
To prevent the template from shifting while you work, use masking tape or quilting pins to secure it to the fabric. Ensure it is taut and flat to avoid wrinkles or distortions in the stipple pattern.
Select Your Stitch Length and Width
Adjust your sewing machine settings to achieve the desired stipple pattern. Typically, you’ll want a shorter stitch length for a dense stipple and a wider width for larger stipple dots.
Experiment with a scrap piece of fabric to find the best settings for your project.
Begin Sewing
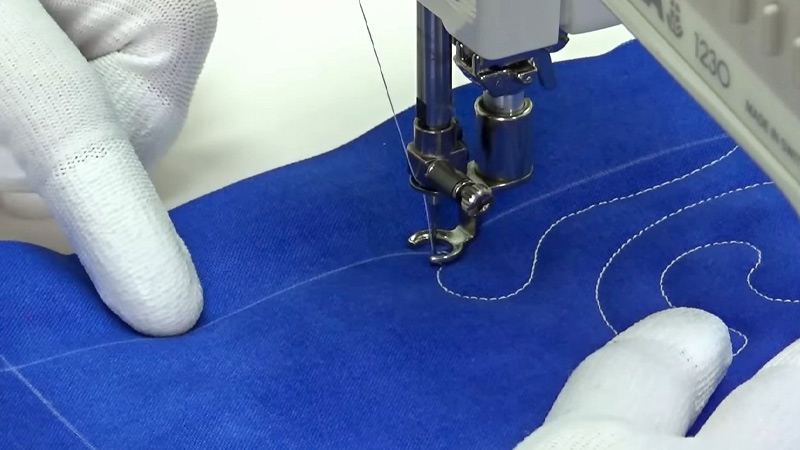
Start sewing along the stippling template, following the lines and curves of the design. Use a free-motion quilting foot if you have one, as it allows for greater maneuverability. Keep a steady pace and practice control to maintain even stitches.
Move the fabric Smoothly
As you sew, moving the fabric smoothly and consistently is crucial. The template will guide your stitch path, but you must control the fabric’s movement. Avoid jerky or erratic motions to maintain a uniform stipple pattern.
Reposition the Template
Depending on your project’s size and design, you may need to reposition the stippling template multiple times to cover the entire area you want to stipple. Align the template carefully each time to ensure a seamless pattern.
Remove the Template
Once you’ve completed the stippling in the desired area, carefully remove the template, taking care not to disturb the fabric.
If there are any leftover marks or residue from securing the template, these can often be gently removed with a fabric-friendly adhesive remover or by washing the fabric.
Following these seven simple methods, you can use a stippling template to create beautifully consistent and intricate stipple patterns in your sewing or quilting projects.
With practice and attention to detail, you’ll be able to achieve professional-looking results that enhance the visual appeal of your work.
Common Mistakes People Make When They Stipple In Sewing

Stippling in sewing can be a beautiful decorative technique, but it also comes with common mistakes.
Here are some of them:
Uneven Stitch Length
One of the most common mistakes in stippling is having inconsistent stitch length. This results in a stipple pattern that looks irregular and messy.
Maintaining a steady sewing speed and even pressure on the foot pedal is important to create uniform stitches.
Adjusting your machine’s settings for a consistent stitch length is crucial.
Jerky Movements
Jerky or abrupt movements of the fabric can lead to uneven stipple lines and irregular patterns. Avoid rushing or forcing the fabric through the machine. Instead, practice smooth and controlled movements to maintain the desired stipple design.
Inadequate template Securing
Failing to properly secure the stippling template to the fabric can shift the template during sewing. This can lead to misaligned or distorted stipple patterns.
Ensure the template is securely fastened with masking tape, pins, or another suitable method to keep it in place throughout the process.
Ignoring Tension Settings
Incorrect tension settings on your sewing machine can cause issues like loose or loopy stitches, disrupting the stippling pattern’s appearance.
Always check and adjust the thread tension according to your machine’s recommendations and the fabric you work with.
Overcrowding Stitches
Stippling should create a random and organic pattern of dots or stitches. A common mistake is overcrowding the stitches, resulting in a dense, cluttered look lacking the desired airy and open texture.
Maintain some space between your stipple lines to achieve a more pleasing effect.
Not Practicing on Scrap Fabric
Beginners often skip the step of practicing stippling on scrap fabric before working on their actual project. This can lead to inconsistencies and errors in the final piece.
Always take the time to practice your stippling technique on a sample fabric to get a feel for the settings and movements required.
Neglecting Thread Tails
Failing to secure and trim thread tails properly at the beginning and end of your stippling lines can lead to messy thread clumps and an unfinished appearance.
Always backstitch or secure the threads at the beginning and end of each stipple line, and trim the excess thread neatly for a clean finish.
Stippling mistakes can be frustrating, but they are common, especially for beginners.
However, with practice and attention to detail, these mistakes can be minimized, allowing you to achieve beautiful and consistent stipple patterns in your sewing and quilting projects.
FAQs
What is stippling in sewing?
Stippling in sewing is a decorative technique where small, closely spaced stitches or dots are used to create intricate patterns or designs on fabric.
This technique is often characterized by its random and organic appearance, adding texture and visual interest to various sewing projects.
What are the common applications of stippling in sewing?
Stippling has diverse applications in sewing and quilting. It is commonly used for quilting to secure layers and add a decorative touch.
Additionally, stippling can be found in garments to enhance texture, on home decor items for embellishment, and in embroidery for creating intricate designs.
How can I create stippling patterns in sewing?
You can use a sewing machine with a free-motion quilting foot or an embroidery machine to create stippling patterns. Alternatively, you can stipple by hand with a needle and thread.
Secure your fabric, choose your stitch settings, and sew closely spaced, random stitches or dots following your desired design.
What are some tips for achieving a successful stipple pattern?
Achieving a successful stipple pattern requires practice and attention to detail. Maintain a consistent stitch length and avoid abrupt movements while sewing. Secure your fabric and template properly to prevent shifting.
Are there any common mistakes to watch out for when stippling in sewing?
Common mistakes include uneven stitch length, jerky movements, inadequate template securing, incorrect thread tension, overcrowding stitches, and neglecting thread tails.
These can lead to irregular stipple patterns. Practicing and paying attention to these factors will help you avoid these issues and achieve better results.
Conclusion
Stippling in sewing is a remarkable fusion of form and function, where meticulous stitching creates practical bonds and exquisite embellishments.
This technique, whether applied in the intricate world of quilting or fashion design, can elevate fabric projects to new heights of creativity.
Its ability to secure quilt layers, add depth to garments, and infuse textiles with textural charm makes it a valuable tool for crafters and artisans.
However, mastering stippling requires patience and practice, as common mistakes like uneven stitch length and jerky movements can detract from the intended effect.
Nevertheless, with dedication and attention to detail, sewers can harness stippling’s potential to enhance their projects, adding a touch of artistry and a tactile dimension to their creations.
As we’ve explored stippling’s functions and potential pitfalls, it becomes evident that this sewing technique offers creative possibilities for those willing to take up the challenge.
Leave a Reply