Friendship bracelet patterns are intricate designs that serve as guides for crafting these beloved tokens of camaraderie.
Understanding these patterns unlocks a world of creative possibilities, allowing crafters to weave together threads in captivating, personalized designs. This guide delves into the art of interpreting these patterns step by step.
From mastering essential knots to deciphering pattern keys, each element plays a crucial role in bringing the bracelet to life. With practice, patience, and attention to detail, reading friendship bracelet patterns becomes an enjoyable and rewarding skill.
So, let’s embark on this creative journey, uncovering the secrets to crafting beautiful, meaningful friendship bracelets.

How to Read Friendship Bracelet Patterns?
Reading friendship bracelet patterns involves understanding the symbols and instructions used to create different patterns.
Here’s a step-by-step guide to help you read friendship bracelet patterns:
Gather Materials:
- Embroidery floss in various colors
- Scissors
- Clipboard or tape to hold your work in place (optional)
- Safety pin or tape for securing the bracelet while working (optional)
Understand the Pattern Key
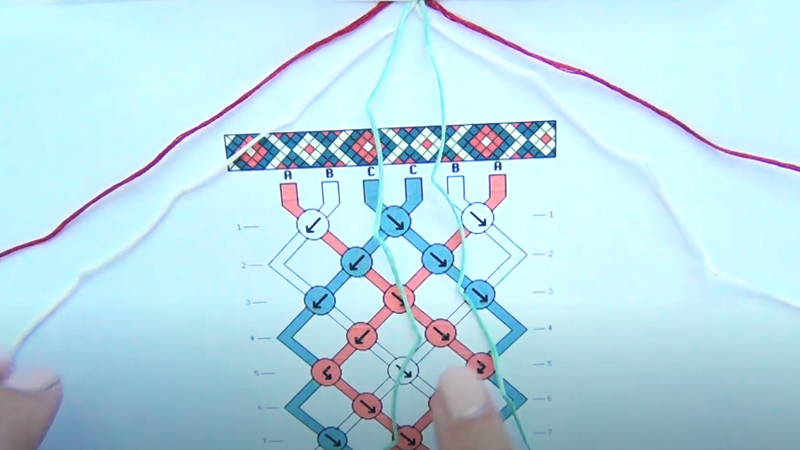
The pattern key is a critical element in deciphering the symbols of a friendship bracelet pattern. It’s like a legend, translating these symbols into corresponding thread colors. .
This key ensures that you use the right colors in the right places, ensuring the pattern turns out as intended. Without understanding the key, following the pattern becomes nearly impossible.
Learn Basic Knots
To master friendship bracelet patterns, you must first become adept at two fundamental knots: the forward knot and the backward knot.
The forward knot involves looping the working thread over the base thread and pulling it through, while the backward knot entails passing the working thread behind the base thread and pulling it through.
These knots serve as the building blocks for the intricate designs that follow.
Read the Pattern
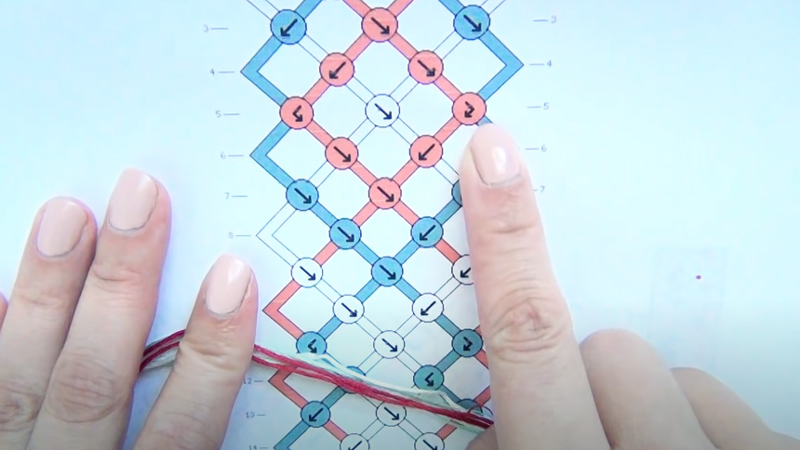
Take a close look at the pattern, whether it’s presented graphically or through a series of symbols and colors.
Understand how the rows and columns interact to form the overall design. Pay attention to how the colors are used, and familiarize yourself with any repeated elements or motifs.
Follow Color Codes
Matching the colors in the pattern with your selected embroidery floss is a crucial step. Each color will have a corresponding symbol or code.
This ensures that you maintain the integrity of the pattern’s design, creating a visually appealing and harmonious finished product.
Identify the Starting Point
Locating the starting point is essential. It’s typically indicated by an arrow, a specific symbol, or a clear instruction in the pattern.
Starting at the correct point ensures that the pattern unfolds in the intended manner, leading to a coherent and well-executed bracelet.
Follow Directional Arrows
The directional arrows within the pattern are your guideposts. They dictate the direction in which you should make knots. Pay close attention to whether the arrow points forwards (→) or backward (←), as this determines whether you should execute a forward or backward knot.
Count Rows and Columns
Maintaining an accurate count of the rows and columns is crucial. This not only ensures that you’re faithfully following the design but also helps you identify and correct any mistakes early on. It’s a small yet critical detail that can greatly impact the final result.
Execute Knots
With a solid understanding of the knots and pattern in hand, it’s time to start knotting.
Follow the symbols and directions provided in the pattern, making sure to use the correct knot (forward or backward) as indicated. Take your time to ensure that each knot is tied securely and neatly.
Weave in Loose Ends
As you approach the end of a color or section, it’s essential to secure any loose ends.
This prevents unraveling and gives your bracelet a polished finish. Carefully weave the loose ends into the existing knots, ensuring they’re well-concealed and won’t come undone.
Refer to the Key as Needed
When you encounter a symbol that you’re unsure of, refer back to the pattern key. It serves as a quick reference, clarifying the meaning of each symbol and its corresponding color. This step ensures that you’re consistently using the correct colors throughout the bracelet.
Check Your Work
Periodically step back and assess your progress. Compare it to the pattern to ensure accuracy.
This practice is invaluable in catching any mistakes early on, making them easier to correct, and ensuring that the overall design remains intact.
Adjust as Necessary
Mistakes are a natural part of the process. If you notice an error, take the time to carefully undo the knots and correct it.
Patience is key; rushing through this step could lead to further mistakes. Take the time to ensure that everything is as it should be.
Finish the Bracelet
With the pattern complete, it’s time to finish the bracelet. This could involve tying knots, adding a closure, or using your preferred finishing technique.
This step ensures that your bracelet is ready to be worn or gifted, and gives it that final, polished touch.
Enjoy Your Bracelet
Now that your bracelet is complete, take a moment to admire your handiwork.
Whether you’re keeping it for yourself or giving it to a friend, take pride in the craftsmanship that went into creating this special piece. It’s a tangible symbol of your care and effort, and a beautiful accessory to enjoy.
What Are the Symbols on a Friendship Bracelet Pattern?

Symbols on a friendship bracelet pattern represent different colors of embroidery floss and indicate the type of knot (forward or backward) to use. These symbols are essential for understanding and executing the pattern accurately.
Here are common symbols used in friendship bracelet patterns:
Colored Squares or Circles
These symbols represent different colors of embroidery floss. Each color is typically assigned a specific symbol or code.
This ensures that you use the correct color in the corresponding sections of the pattern. For example, a blue square might indicate that you should use a blue thread.
Arrows (→, ←)
Arrows are essential directional indicators in friendship bracelet patterns. They tell you which way to make your knots. A forward arrow (→) instructs you to make a forward knot, where the working thread goes over the base thread.
Conversely, a backward arrow (←) signals a backward knot, with the working thread going behind the base thread.
Dots (·)
Dots serve as markers for specific actions within the pattern. They might indicate where a color change should occur, or they could signify the placement of a particular knot. Dots provide visual cues for executing the pattern accurately.
Numbers
Numbers can be used to indicate the quantity of knots to be made in a particular section. For instance, if you see the number “3” next to a symbol, it means you should make three knots using the designated knotting technique.
Letters or Abbreviations
In some cases, letters or abbreviations may be used to represent specific colors, especially when a color key is provided.
For example, “B” might stand for blue, “Y” for yellow, and so on. This method is especially useful for patterns with a limited number of colors.
Other Custom Symbols
Depending on the complexity of the pattern or the designer’s preference, custom symbols or shapes may be used to represent specific design elements or techniques. These symbols are typically explained in the pattern key.
Common Friendship Bracelet Patterns

There are numerous friendship bracelet patterns, each with its own unique design and level of complexity.
Here are some common friendship bracelet patterns that you can try:
Stripes
Stripes are a classic and straightforward pattern. They involve creating horizontal or vertical bands of color by alternating different thread colors. The number of stripes and their width can be adjusted to create various striped designs.
Chevron
Chevron patterns are known for their distinctive zigzag or V-shaped design. This effect is achieved by using a specific sequence of forward and backward knots.
Chevron patterns can range from simple to intricate, depending on the number of rows and colors used.
Diamonds
Diamond patterns consist of diamond-shaped designs formed by varying colors and knots in a repetitive sequence. These patterns can be adjusted in size and complexity by changing the number of rows and colors.
Hearts
Heart patterns incorporate heart-shaped motifs into the bracelet’s design. These patterns are perfect for expressing love and friendship. They can vary in size and include single hearts or multiple heart motifs.
Fishbone
Fishbone patterns create a central spine with diagonal lines extending from it, resembling the skeleton of a fish. These patterns can be simple or elaborate, depending on the number of diagonal lines used.
Alpha Patterns
Alpha patterns involve creating letters, numbers, or words using different colors of thread. These patterns are popular for personalizing bracelets with names, initials, or meaningful messages.
Crosses
Cross patterns feature cross-shaped designs in various sizes and configurations. They can be created as standalone motifs or incorporated into more intricate designs.
Double Chevron
Double chevron patterns are an extension of the classic chevron pattern. They create a more complex zigzag design by incorporating additional rows or colors.
Triangles
Triangle patterns consist of repeating triangular shapes created by varying colors and knotting techniques. These patterns can be adapted to form larger or smaller triangles and can be arranged in different ways.
Arrowheads
Arrowhead patterns resemble the tip of an arrow, featuring a pointed design that can be arranged in various directions. These patterns can be adjusted in size and complexity.
Rainbow
Rainbow patterns use a spectrum of colors to create a vibrant and colorful design. These patterns often involve arranging colors in a specific order to achieve the rainbow effect.
Tips for Success
Creating friendship bracelets can be a rewarding and enjoyable craft, but understanding and following friendship bracelet patterns can be challenging for beginners. To help you succeed in reading and following these patterns.
Here are some valuable tips:
Start with Simple Patterns
Beginners should opt for patterns with fewer colors and uncomplicated designs. These patterns allow you to grasp the fundamentals without feeling overwhelmed.
As you become more confident, you can gradually progress to more intricate and challenging designs.
Gather High-Quality Materials
Invest in good-quality embroidery floss. High-quality materials not only enhance the appearance of your bracelets but also make the crafting process smoother. They’re less likely to tangle or fray, allowing for a neater and more enjoyable experience.
Familiarize Yourself with Knots
Before delving into patterns, spend time perfecting your knotting technique.
Practice forward knots and backward knots until they become second nature. This proficiency will form the basis for creating intricate patterns with ease.
Study the Pattern Key
The pattern key is your guide to deciphering the symbols and color codes. It’s essential to understand this legend before you begin crafting. The key correlates each symbol with a specific color of thread, ensuring accuracy in your work.
Use a Clipboard or Tape
To maintain a steady and organized workspace, consider using a clipboard or tape to secure your bracelet while you work. This prevents threads from tangling and helps you follow the pattern more accurately.
Keep Your Workspace Neat
A tidy workspace is essential for an enjoyable and efficient crafting experience. Keep your materials organized and your workspace clutter-free. This minimizes the risk of losing threads or making mistakes due to confusion.
Count Rows and Columns
Regularly count the rows and columns as you progress through the pattern. This simple yet effective practice ensures that you’re staying on track and helps identify any errors early on, maintaining pattern accuracy.
Practice Patience
Friendship bracelet-making is a craft that requires patience. Mistakes are part of the learning process, so don’t be discouraged by them.
View each mistake as an opportunity to learn and improve your skills. Take your time to correct errors and enjoy the creative journey.
Start with the Right Thread Length
Cut your embroidery floss into manageable lengths. Threads that are too long can become tangled and unwieldy, making it challenging to work with. On the other hand, threads that are too short may require frequent re-threading, interrupting your flow.
Weave in Loose Ends Securely
When transitioning between colors or finishing a section, be sure to weave in loose ends securely.
This prevents unraveling and gives your bracelet a clean, polished finish. Taking the time to do this properly ensures the longevity of your creation.
Refer to the Pattern Frequently
Keep the pattern and key within easy reach, and refer to them regularly. This practice helps prevent mistakes and ensures that you’re following the pattern accurately. It’s a simple yet crucial habit that can greatly impact the final result.
Don’t Rush the Finishing
Take your time when finishing the bracelet. Whether you’re tying knots or adding a closure, a well-executed ending contributes to the overall quality of your creation. Rushing this step can result in a less polished final product.
Practice Makes Perfect
Like any skill, practice improves your ability to read and execute friendship bracelet patterns.
Don’t be discouraged by initial challenges. With consistent effort and practice, your proficiency will grow, and you’ll find the process becoming more intuitive.
FAQs
What is a friendship bracelet pattern?
A friendship bracelet pattern is a design guide that uses symbols, colors, or both to represent a specific bracelet design.
Why is it essential to understand a pattern key?
Understanding the pattern key is crucial because it deciphers the symbols used in the pattern, correlating them with thread colors.
What are the basic knots in friendship bracelet patterns?
The two fundamental knots in friendship bracelet-making are the forward knot and the backward knot.
Why should I count rows and columns in a pattern?
Counting rows and columns helps maintain accuracy and ensures that you’re following the pattern correctly.
How can I improve my skills in reading friendship bracelet patterns?
Improving your skills requires practice and patience. Start with simple patterns, reference the key as needed, and don’t be discouraged by mistakes.
Wrap Up
Mastering the art of reading friendship bracelet patterns opens up a world of creative expression and heartfelt gifting. Through understanding symbols, perfecting knots, and following color codes, intricate designs come to life.
Maintaining a neat workspace and counting rows ensures accuracy, while patience and practice become allies in the crafting process. As we conclude this journey, remember that every knot ties not just threads, but also memories and bonds.
Whether you’re creating for yourself or gifting to a friend, each bracelet carries a piece of your heart. Embrace this craft, and let your imagination intertwine with threads, weaving stories of friendship and love.
Leave a Reply