Embroidery is an ancient and intricate art form that allows individuals to bring creativity to life through needle and thread. One of the enchanting stitches within the realm of embroidery is the fern stitch.
Resembling the delicate fronds of a fern plant, the fern stitch adds a touch of nature’s elegance to various textile projects.
Whether you’re a seasoned embroidery enthusiast or a beginner, mastering this stitch can open up a world of possibilities for embellishing fabric with graceful foliage, vine-like patterns, or intricate detailing.
In this guide, we will explore how to do fern stitch in embroidery.
Each step will be accompanied by detailed explanations to ensure that you can easily grasp and apply this technique in your embroidery projects.
From selecting the right materials to forming the fern fronds, you will soon find yourself crafting beautiful, nature-inspired designs with confidence.
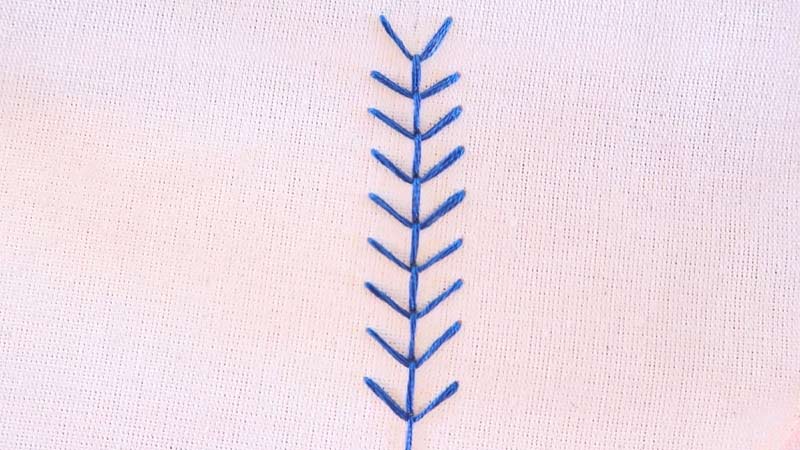
How To Do Fern Stitch In Embroidery?
Fern stitch is a lovely and versatile embroidery stitch that resembles the delicate fronds of a fern plant. It’s used in various embroidery projects to create foliage, vines, or decorative accents.
Here are the simple steps to help you master the fern stitch:
Prepare Your Fabric and Thread

Begin by selecting a fabric suitable for your embroidery project, and choose the embroidery floss or thread colours you’d like to use.
Thread your embroidery needle with a strand of the chosen thread, making sure it’s not too long to avoid tangling.
Starting Point
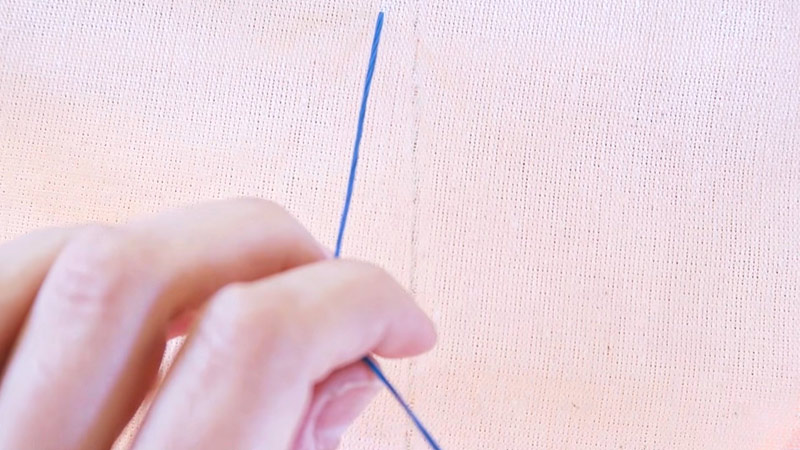
Decide where you want to begin your fern stitch. Insert the needle from the backside of the fabric to the front, coming up at the starting point.
This will be the base of your fern frond.
Make the First Stitch
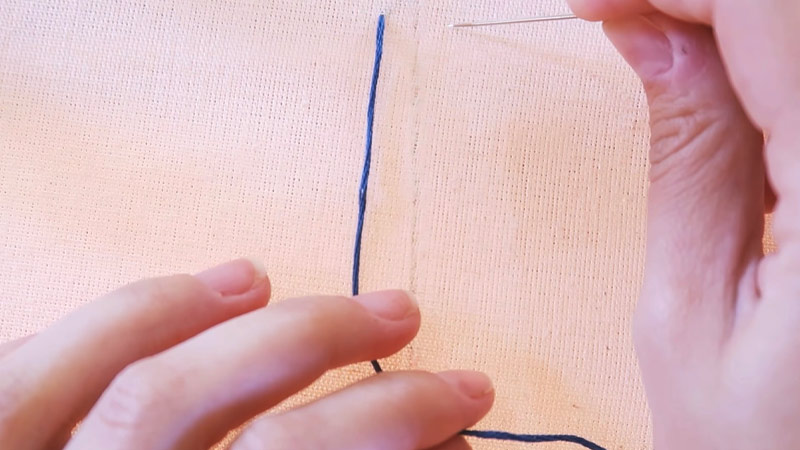
To create the first fern frond, bring the needle back down into the fabric a short distance away from the starting point, at a 45-degree angle from the initial stitch.
This first stitch should be shorter than the desired length of your fern frond.
Create the “V” Shape
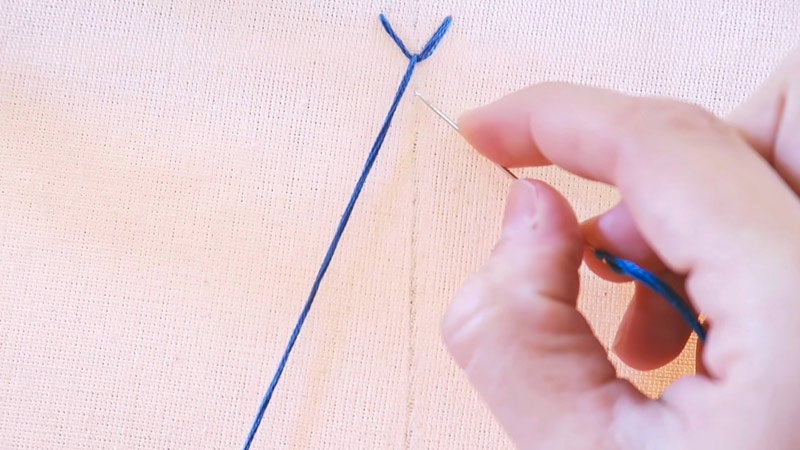
Now, bring the needle up again at the centre of the initial stitch. This will create a “V” shape, with the starting point at the bottom of the “V” and the centre point at the top.
Extend the Frond
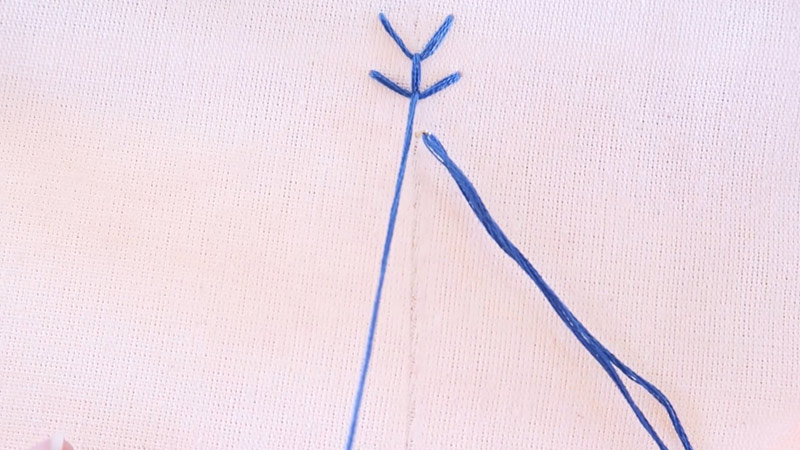
To extend the fern frond, make another stitch from the centre point outwards, similar in length to the first one. This will form one side of the front. Repeat this step on the other side of the “V,” creating a mirror image.
Continue Adding Fronds
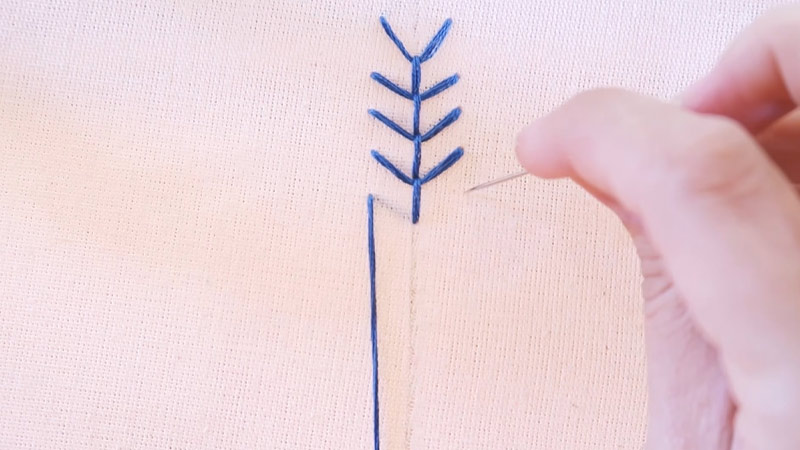
Keep adding fern fronds along your desired pattern or shape. Remember to maintain equal spacing between them and ensure they point in the same direction for a cohesive look.
Finishing Off
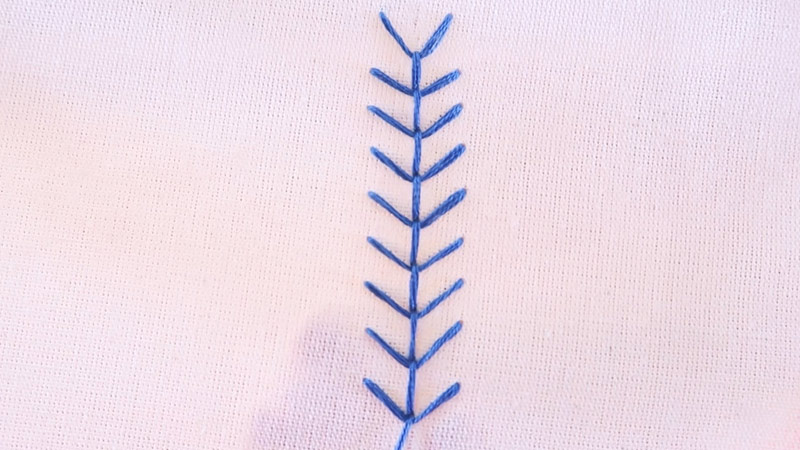
To secure your work, take the needle to the backside of the fabric and tie a small knot or weave the thread through the backstitches. Trim any excess thread carefully, and your fern stitch embroidery is complete.
Practice is key to mastering the fern stitch, as it may take a bit of time to get the spacing and angles just right.
Once you become more comfortable with this stitch, you can experiment with different thread colours and lengths to create beautiful, intricate, fern-inspired designs in your embroidery projects.
What Is Fern Stitch Used For?
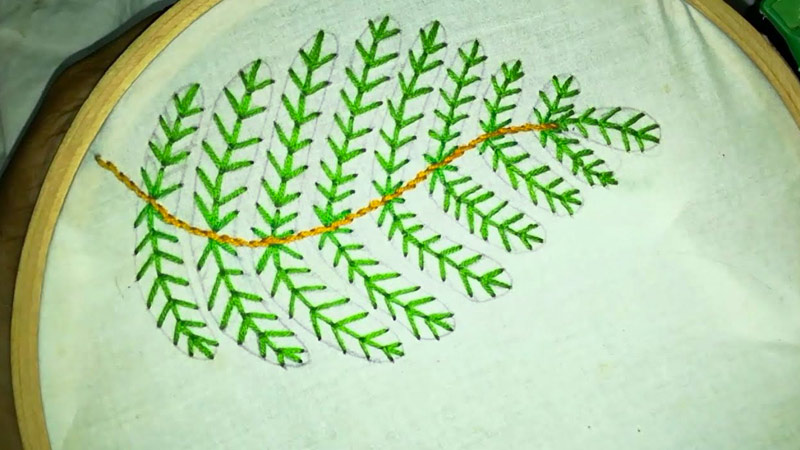
Fern stitch is a versatile embroidery stitch that can be used for various purposes. Here are the usages of fern stitch:
Creating Foliage
Fern stitch can be used to create realistic or stylized leaves, branches, ferns, and other types of greenery. It can be stitched along straight or curved lines, and the length and angle of the stitches can be varied to create different effects.
Fern stitch can also be combined with other stitches, such as French knots, straight stitches, or detached chain stitches, to add more details and textures to the foliage.
Creating Floral Sprays
Fern stitch can also be used to create delicate and elegant floral sprays. By adding small stitches or knots at the end of each fern stitch group, you can create tiny flower buds or berries.
You can also use different colours and thicknesses of thread to create contrast and depth. Fern stitch is perfect for creating sprigs of lavender, baby’s breath, or other small flowers.
Creating Geometric Patterns
Fern stitch can also be used to create interesting geometric patterns by stitching it in multiple rows or shapes. You can use fern stitch as an open fill stitch for larger areas or as a border for smaller designs.
You can also outline your fern stitch shapes with backstitch or other stitches to create more definition and contrast.
Creating Underwater Scenes
Fern stitch can also be used to create underwater scenes, such as seaweed, coral, or kelp. By using different shades of green and blue, you can create a realistic or whimsical underwater effect.
You can also add other stitches, such as satin stitch, stem stitch, or French knots, to create fish, shells, or bubbles.
Creating Feathers
Fern stitch can also be used to create feathers, either as part of a bird design or as a standalone motif.
By stitching the fern stitch along a curved line and varying the length and angle of the stitches, you can create a feather shape that looks natural and fluffy.
You can also use different colours and thicknesses of thread to create different types of feathers.
Creating Veins On Leaves
Fern stitch can also be used to create veins on leaves, either as a realistic detail or as a decorative element.
By stitching the fern stitch along the centre of a leaf shape, you can create a vein that adds dimension and texture to the leaf.
You can also use different colours and thicknesses of thread to create contrast and interest.
Creating Circular Shapes
Fern stitch can also be used to create circular shapes, such as wreaths, mandalas, or suns.
By stitching the fern stitch in a circular motion and varying the length and angle of the stitches, you can create a circular shape that looks open and lacy.
You can also add other stitches, such as French knots, straight stitches, or detached chain stitches, to add more details and embellishments.
What Common Mistakes Do People Make While Doing Fern Stitch In Embroidery?
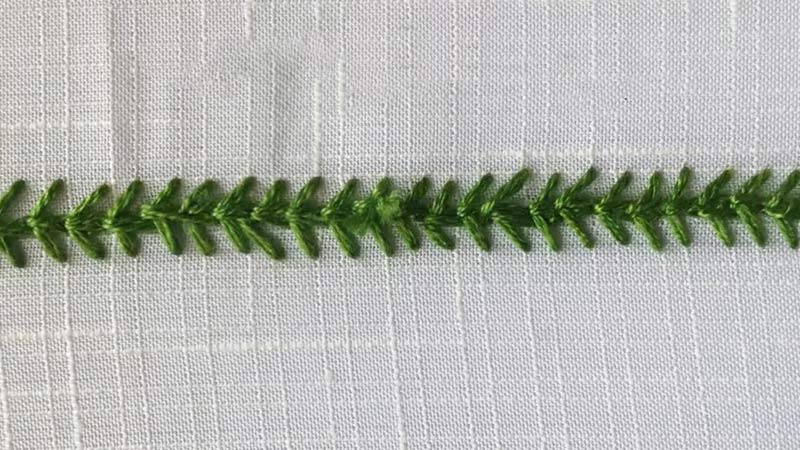
Fern stitch is a simple and elegant embroidery stitch, but it can also be tricky to master.
Here are some common mistakes people make while doing fern stitch in embroidery and how to avoid them:
Making The Stitches Too Tight Or Too Loose
If the stitches are too tight, they will pull the fabric and create wrinkles. If the stitches are too loose, they will look sloppy and uneven.
To avoid this, use a hoop or a frame to keep the fabric taut and adjust the tension of the thread as you stitch. You can also use a needle appropriate for the material and thread you are using.
Making The Stitches Too Long Or Too Short
If the stitches are too long, they will look disproportionate and may snag easily. If the stitches are too short, they will look crowded and may not cover the fabric well.
To avoid this, use a ruler or a tape measure to mark the length of the stitches on your fabric with a water-soluble pen or a pencil. You can also use your needle as a guide to measure the length of the stitches.
Making The Stitches Too Close Or Too Far Apart
If the stitches are too close, they will overlap and create bulk. If the stitches are too far apart, they will look sparse and leave gaps.
To avoid this, use three parallel lines as guides for your stitches. The distance between the lines can vary depending on how dense or open you want your fern stitch to be.
A good starting point is about half an inch apart.
Making The Stitches Uneven Or Asymmetrical
If the stitches are uneven or asymmetrical, they will look distorted and unbalanced. To avoid this, use a consistent angle and direction for your stitches. You can also use a grid or a pattern to help you align your stitches.
If you want to make your fern stitch look more natural and realistic, you can vary the length and angle of the stitches slightly, but not too much.
Making The Stitches In The Wrong Order
If you make the stitches in the wrong order, you will end up with gaps or overlaps in your fern stitch.
To avoid this, follow this sequence: make a small straight stitch along the middle line, then make two diagonal stitches on either side of it, all ending in the same hole. Repeat this along the line until you reach the end.
Making The Stitches In The Wrong Direction
If you make the stitches in the wrong direction, you will end up with a reversed fern stitch that looks different from what you intended.
To avoid this, remember this rule: if you are working from left to right, make your diagonal stitches from top to bottom; if you are working from right to left, make your diagonal stitches from bottom to top.
Making Mistakes In Counting Or Spacing
If you make mistakes in counting or spacing, you will end up with irregular or incomplete fern stitch groups.
To avoid this, use a stitch counter or a marker to keep track of your stitches and groups. You can also use a chart or a diagram to help you plan your fern stitch design.
Making Mistakes In Finishing Or Securing:
If you make mistakes in finishing or securing, you will end up with loose or frayed ends that may unravel or damage your work.
To avoid this, use a knot or a loop to secure your thread at the beginning and end of your work.
You can also weave your thread under some existing stitches on the back of your fabric to hide it.
Making Mistakes In Washing Or Ironing:
If you make mistakes in washing or ironing, you will end up with faded or stained colors, wrinkled or distorted fabric, or melted or damaged threads.
To avoid this, follow these tips: wash your work by hand with mild soap and cold water; rinse well and gently squeeze out excess water; lay flat on a towel to dry; iron on low heat with a pressing cloth; store in a cool and dry place.
FAQ
What materials do I need for fern stitch embroidery?
To do fern stitch embroidery, you’ll need embroidery fabric, an embroidery hoop, embroidery floss or thread, and embroidery needles. Choose your fabric and thread colours based on your project’s requirements.
How do I start a fern stitch?
Begin by bringing the needle up from the back of the fabric to the front at your desired starting point.
How do I create the fern fronds?
After the initial stitch, form a “V” shape by bringing the needle back down at the centre of the first stitch. Extend the front by making two more stitches on each side of the “V.”
Can I use fern stitch for different embroidery designs?
Absolutely! Fern stitch is versatile and can be adapted for various designs, such as leaves, vines, or decorative elements.
Experiment with different lengths and spacings to achieve your desired look.
How do I finish off a fern stitch embroidery project?
To secure your work, take the needle to the backside of the fabric, tie a small knot, or weave the thread through the backstitches.
Trim any excess thread carefully to complete your fern stitch embroidery.
Conclusion
In the world of embroidery, the fern stitch stands as a testament to the beauty that can be achieved through needlework.
As you’ve journeyed through the seven simple steps of creating the fern stitch, you’ve unlocked a captivating way to infuse your embroidery projects with organic charm and grace.
Remember that, like any art form, practice makes perfect. While mastering the fern stitch may take some time, the satisfaction of watching your creations flourish with intricate fern-like fronds is well worth the effort.
This stitch is not only versatile but also adaptable, allowing you to customize it to your unique vision.
Whether you’re crafting a nature-themed masterpiece or simply adding a touch of elegance to your textiles, the fern stitch is a valuable skill in your embroidery repertoire.
So, pick up your needle and thread, and let your imagination bloom as you incorporate the fern stitch into your embroidery projects, adding a touch of timeless beauty to each piece you create.
Leave a Reply