The world of embroidery is a treasure trove of stitches that allow artisans to weave stories and designs into fabric.
Among these stitches, the fishbone stitch is a beautiful and versatile technique that creates intricate leaf patterns resembling the delicate bones of a fish.
Whether you’re a novice embroiderer or a seasoned enthusiast, mastering the fishbone stitch can add depth and dimension to your embroidery projects.
In this guide, we’ll explore fishbone stitch- how to do it, breaking down the process into easy-to-follow steps.
Each step will be accompanied by detailed descriptions and tips to ensure you can grasp the technique with confidence.
From choosing the right materials to creating graceful leaf motifs, this guide will help you unlock the potential of the fishbone stitch and open doors to a world of creative possibilities in your embroidery journey.
Fishbone Stitch- How To Do
Here are different methods to do fishbone stitch:
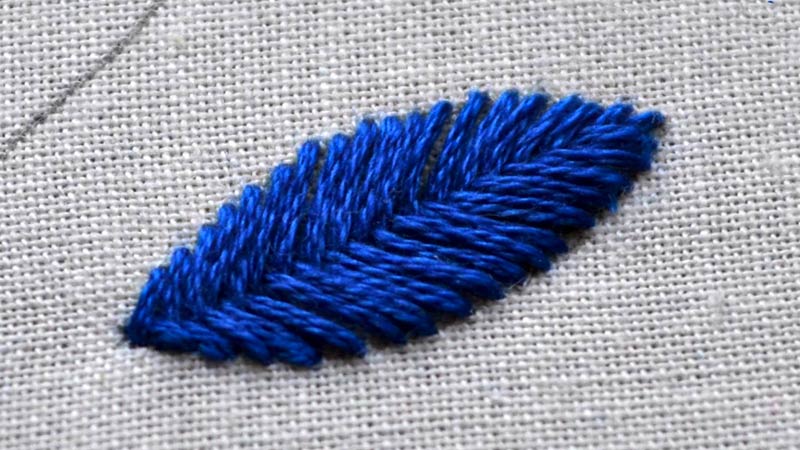
Flat Fishbone Stitch

This is the basic method of fishbone stitch that creates a flat and smooth filling for shapes like leaves or feathers. It consists of a series of slanted stitches that overlap in the middle, creating a centre spine.
To do this method, you need to draw a leaf shape on your fabric and mark the centre line. Start with a small straight stitch at the top of the shape, then make two diagonal stitches on either side of it, crossing the centre line.
Repeat this process, alternating sides, until you fill the shape.
Open Fishbone Stitch
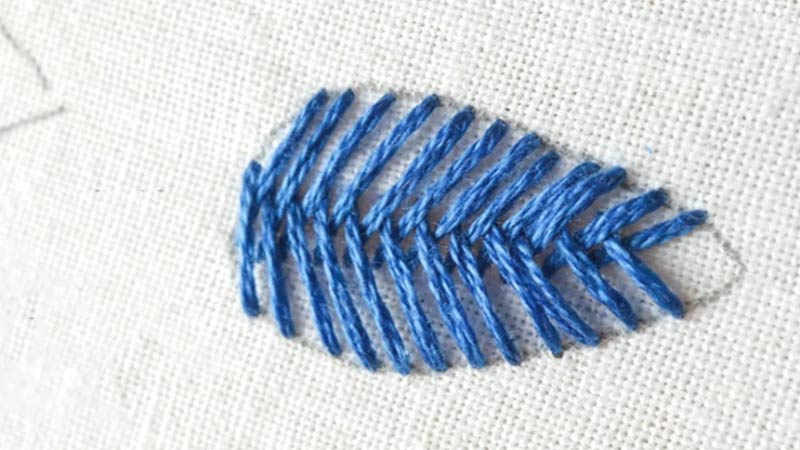
This is a variation of the flat fishbone stitch that creates a more open and lacy filling for shapes. It is worked in a similar way as the flat fishbone stitch, except the stitches are spaced farther apart.
You can vary the amount of space between the stitches to create different effects. This method can also be used to create a unique border along a line.
Raised Fishbone Stitch
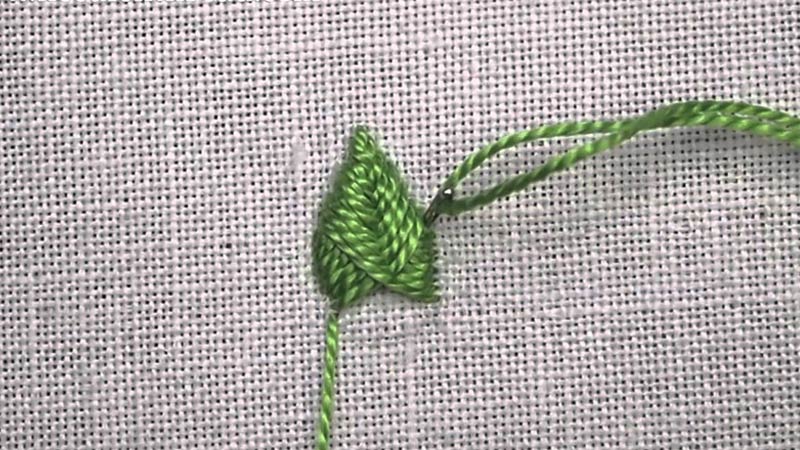
This is another variation of the flat fishbone stitch that creates a more textured and dimensional filling for shapes.
It is worked in a similar way as the flat fishbone stitch, except you need to pad the shape with some straight stitches before doing the fishbone stitch over them.
This method creates a raised effect that makes the shape stand out from the fabric.
Fishbone Knot Stitch
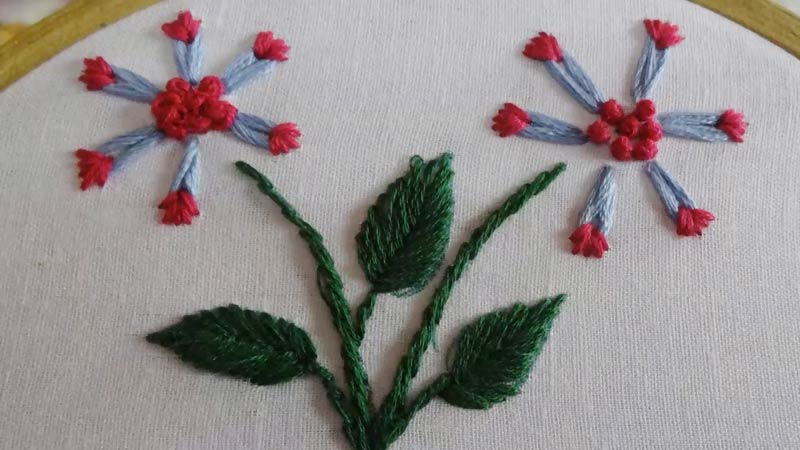
This is a combination of fishbone stitch and French knot that creates a more decorative and detailed filling for shapes.
It is worked in a similar way as the flat fishbone stitch, except you need to make a French knot at the end of each diagonal stitch. This method adds some colour and interest to the shape.
Fishbone Chain Stitch
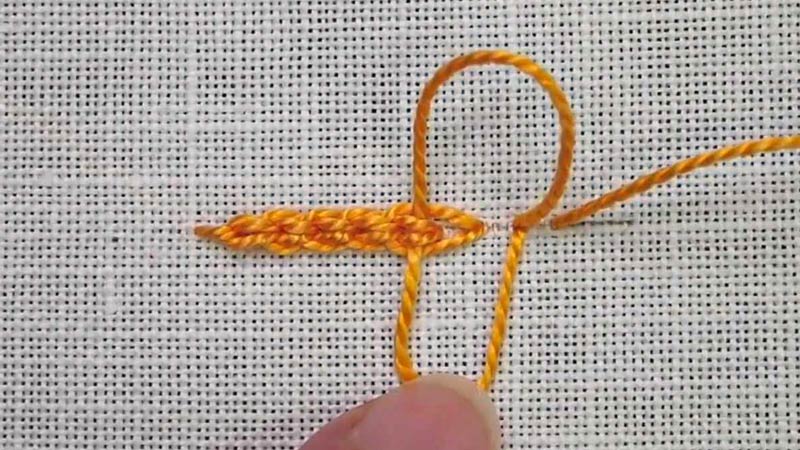
This is another combination of fishbone stitch and chain stitch that creates a more elegant and intricate filling for shapes.
It is worked in a similar way as the flat fishbone stitch, except you need to make a chain stitch at the end of each diagonal stitch.
This method creates a looped effect that adds some grace and movement to the shape.
Fishbone Satin Stitch
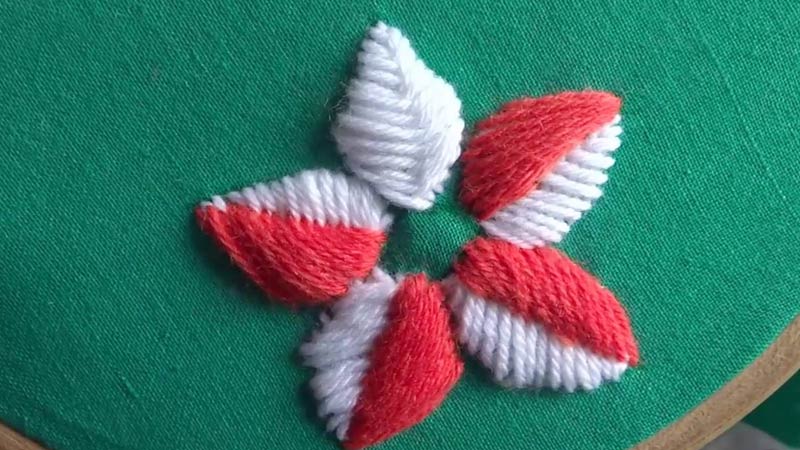
This is a blend of fishbone stitch and satin stitch that creates a more smooth and shiny filling for shapes.
It is worked in a similar way as the flat fishbone stitch, except you need to make each diagonal stitch longer and closer together, covering most of the fabric. This method creates a satin-like effect that adds some gloss and richness to the shape.
Fishbone Feather Stitch
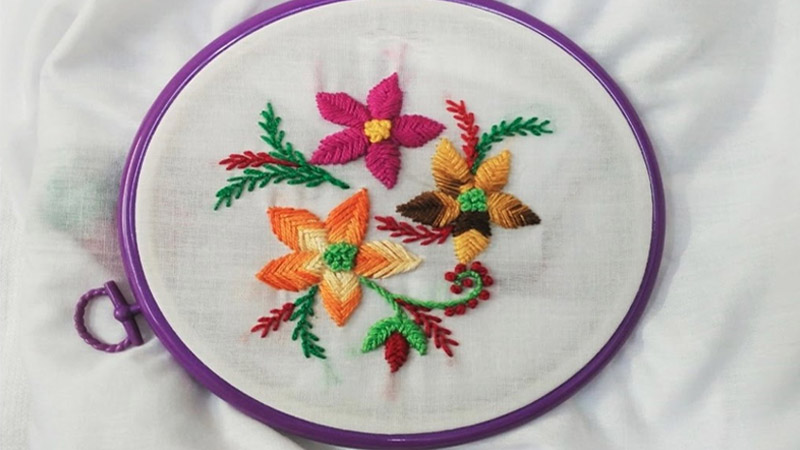
This is an extension of the fishbone stitch and feather stitch that creates a more realistic and natural filling for shapes like feathers or leaves.
It is worked in a similar way as the flat fishbone stitch, except you need to make each diagonal stitch shorter and farther apart, leaving some space between them.
Then, you need to add some small straight stitches along the edges of the shape, creating some fringes or serrations.
This method creates a feather-like effect that adds some texture and character to the shape.
Design Ideas For Fishbone Stitch
Here are design ideas for fishbone stitch:
A Tropical Fish
You can use a fishbone stitch to create a colourful and realistic tropical fish. You can draw an outline of a fish shape on your fabric and divide it into sections.
Then, you can fill each section with fishbone stitches in different colours, following the curve of the fish.
You can also add some details with other stitches, such as backstitch, satin stitch, or French knots.
A Sunflower
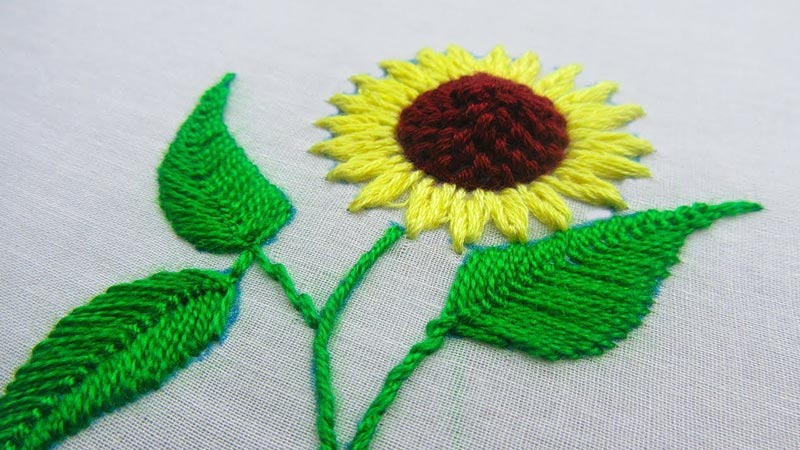
You can use a fishbone stitch to create a bright and cheerful sunflower. You can draw a circle on your fabric and fill it with a fishbone stitch in yellow, starting from the centre and radiating outwards.
You can also add some brown or black stitches in the centre to create the seeds.
A Feather
You can use a fishbone stitch to create a delicate and natural feather. You can draw an outline of a feather shape on your fabric and mark the centre line.
Then, you can fill the shape with a fishbone stitch in white or any colour you like, following the direction of the feather.
You can also add some fringes or serrations along the edges with straight stitches.
A Butterfly
You can use a fishbone stitch to create a beautiful and intricate butterfly. You can draw an outline of a butterfly shape on your fabric and divide it into sections.
Then, you can fill each section with fishbone stitches in different colours and patterns, following the shape of the butterfly.
You can also add some details with other stitches, such as chain stitch, stem stitch, or French knots.
A Heart
You can use a fishbone stitch to create a romantic and lovely heart. You can draw an outline of a heart shape on your fabric and mark the centre line.
Then, you can fill the shape with a fishbone stitch in red or pink, starting from the bottom and working upwards.
You can also add some embellishments with other stitches, such as lazy daisy, cross stitch, or beads.
A Leaf Wreath
You can use a fishbone stitch to create a festive and elegant leaf wreath. You can draw a circle on your fabric and fill it with a fishbone stitch in green, making small leaf shapes along the circle.
You can also add some berries or flowers with other stitches, such as French knots, detached chain stitches, or woven wheels.
A Pineapple
You can use a fishbone stitch to create a fun and juicy pineapple. You can draw an outline of a pineapple shape on your fabric and divide it into sections.
Then, you can fill each section with fishbone stitches in yellow or orange, making diagonal lines to create the texture of the pineapple.
You can also add some leaves with fishbone stitch in green.
What Mistakes Not To Make In Fishbone Stitch?
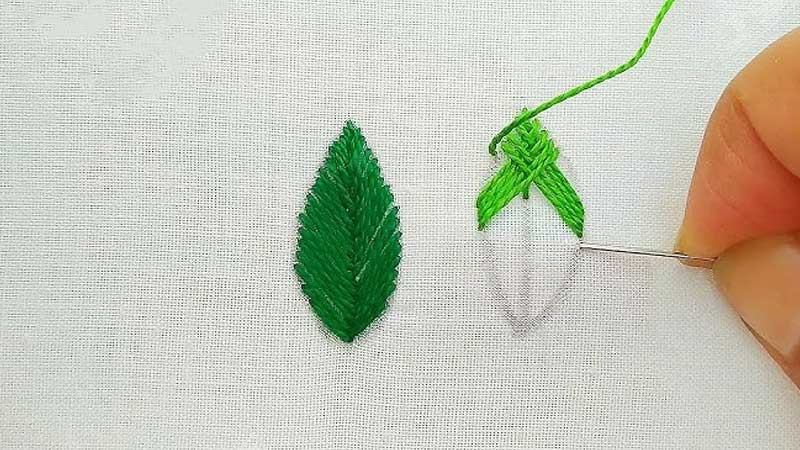
A fishbone stitch is a kind of filling stitch that is ideal for making leaves or feathers. However, it can also be tricky to master and prone to some mistakes.
Here are the mistakes not to make in fishbone stitch and how to avoid them:
Not Marking The Centre Line:
The centre line is the guide for making the fishbone stitch, as it determines where the stitches overlap and creates the spine effect.
If you do not mark the centre line, you may end up with uneven or crooked stitches that do not look neat or realistic.
To avoid this, use a water-soluble pen or a pencil to draw a line down the centre of the shape you want to fill with a fishbone stitch.
Not Starting From The Top
The fishbone stitch is worked from the top of the shape to the bottom, making diagonal stitches on either side of the centre line.
If you start from the bottom or the middle, you may have difficulty filling the shape evenly and smoothly.
To avoid this, start with a small straight stitch at the top of the shape, then make two diagonal stitches on either side of it, crossing the centre line.
Not Following The Curve Of The Shape
The fishbone stitch is meant to follow the curve of the shape you are filling, creating a natural and organic effect.
If you make your stitches too straight or too slanted, you may end up with a flat or distorted shape that does not look appealing.
To avoid this, adjust the angle and length of your stitches according to the curve of the shape, making them shorter and steeper near the edges and longer and flatter near the centre.
Not Spacing The Stitches Properly
The spacing between the stitches can affect the appearance and texture of the fishbone stitch. If you make your stitches too close together, you may create a dense and bulky filling that covers too much of the fabric.
If you make your stitches too far apart, you may create a sparse and loose filling that leaves too many gaps.
To avoid this, space your stitches evenly and moderately, leaving some fabric visible between them.
Not Ending At The Bottom
The fishbone stitch is finished at the bottom of the shape, where all the stitches meet at one point. If you do not end at the bottom, you may leave some fabric uncovered or some stitches hanging.
To avoid this, make sure to fill the shape completely and neatly, ending with a small straight stitch at the bottom.
Not Securing Or Hiding The Thread Ends
The fishbone stitch requires a lot of thread, as it involves making long diagonal stitches across the fabric.
If you do not secure or hide your thread ends properly, you may end up with loose or frayed ends that may unravel or damage your work. To avoid this, use a knot or a loop to secure your thread at the beginning and end of your work.
You can also weave your thread under some existing stitches on the back of your fabric to hide it.
Not Choosing Suitable Colours Or Fabrics
The fishbone stitch can create beautiful effects with different colours and fabrics, but it can also clash or contrast with them if not chosen carefully.
If you use colours that are too similar or too different from each other or from the fabric, you may lose or overwhelm the details of the fishbone stitch.
If you use fabrics that are too thick or too thin for your thread or needle, you may have difficulty making or seeing your stitches. To avoid this, choose colours that complement each other and match your fabric.
FAQ
What is a fishbone stitch in embroidery?
The fishbone stitch is an embroidery technique used to create leaf-like patterns that resemble fish bones. It’s ideal for adding dimension and texture to floral and botanical designs.
What materials do I need for fishbone stitch embroidery?
You’ll need embroidery fabric, an embroidery hoop, embroidery floss or thread, and embroidery needles. Select thread colours that match your design.
Can beginners learn the fishbone stitch?
Absolutely! While it may take practice, beginners can learn the fishbone stitch with patience.
Start with simple designs and gradually tackle more complex patterns as your skills improve.
What are some common applications of the fishbone stitch?
Fishbone stitch is often used for creating leaves, petals, and feather-like textures in embroidery.
It’s popular in floral and nature-themed designs, as well as for adding intricate details to various textile projects.
How do I ensure my fishbone stitch looks neat and uniform?
To achieve a clean and uniform fishbone stitch, pay attention to stitch length and spacing.
Practice consistency in your stitches, maintain even tension, and use an embroidery hoop to keep your fabric taut. With practice, your fishbone stitch will become more polished and refined.
Conclusion
The fishbone stitch is a captivating embroidery technique that empowers artists to bring nature’s beauty to life on fabric.
As we conclude our exploration of this exquisite stitch, you’ve learned how to create intricate leaf-like patterns with finesse and precision.
With practice and patience, the fishbone stitch can become a valuable addition to your embroidery repertoire. It allows you to craft stunning floral designs, elegant leaves, and intricate details in your projects.
As you continue to refine your skills, you’ll discover the joy of creating lifelike, textured motifs that elevate your embroidery from ordinary to extraordinary.
So, pick up your embroidery needle and thread, and let the fishbone stitch be your artistic muse.
Whether you’re embellishing clothing, home decor, or crafting beautiful gifts, this stitch will add a touch of nature’s grace and elegance to your creations, leaving a lasting impression on those who behold your embroidered masterpieces.
Leave a Reply