Bleach tie-dyeing is a captivating technique that transforms a plain sweatshirt into a personalized work of art. This creative process involves using bleach to lighten specific areas, resulting in intricate patterns and a unique, edgy aesthetic.
Whether you’re drawn to bold, dynamic designs or prefer subtle, understated patterns, this DIY project offers endless possibilities.
From folding techniques to precise application methods, mastering the art of bleach tie-dye allows you to unleash your creativity onto fabric.
In this guide, we’ll delve into step-by-step instructions and creative tips, empowering you to embark on a bleach tie-dye journey that culminates in a one-of-a-kind, fashion-forward sweatshirt.
What Is Bleach Tie-Dye a Sweatshirt?
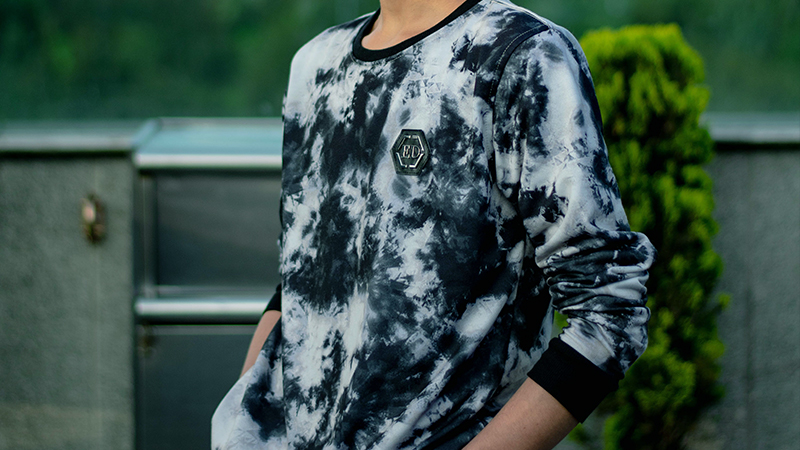
Bleach tie-dyeing is a creative textile art technique that transforms a plain sweatshirt into a unique, personalized masterpiece.
Unlike traditional tie-dye methods that involve adding color, bleach tie-dye involves removing or lightening the existing color using a bleach solution.
The process begins by folding, twisting, or binding the sweatshirt in various ways to create intricate patterns. Then, a mixture of bleach and water is applied to specific areas, resulting in a striking contrast between the lightened and original fabric.
This technique allows for endless customization, enabling individuals to express their creativity and fashion sense while repurposing or revamping their clothing with a distinctive, eye-catching aesthetic.
How to Bleach Tie-Dye a Sweatshirt?
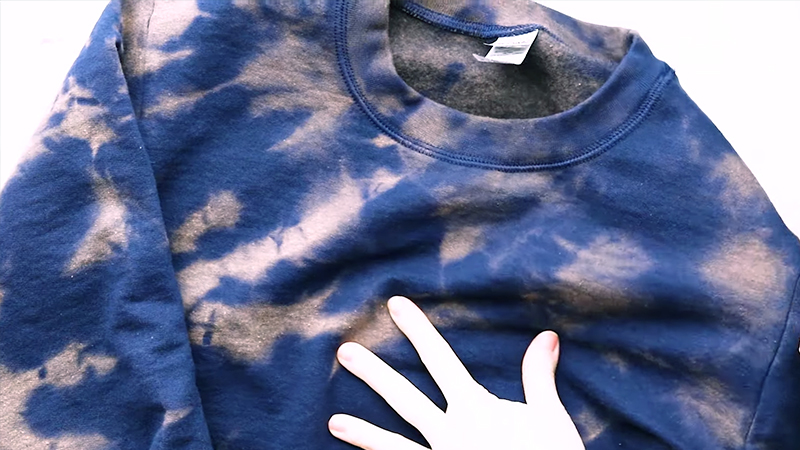
Bleach tie-dye is a popular and creative way to transform a plain sweatshirt into a unique and stylish fashion statement.
This technique involves using bleach to remove or lighten the color of the fabric in specific patterns, resulting in a tie-dye effect. It’s a fun and customizable DIY project that allows you to express your creativity.
Here’s a step-by-step guide on how to bleach tie-dye a sweatshirt:
What You’ll Need:
- A plain cotton sweatshirt
- Bleach
- Plastic squeeze bottles or spray bottles
- Rubber bands
- Plastic gloves
- Plastic sheets or garbage bags to protect your work surface
- Plastic bucket or basin
- Water
- Plastic or wooden stirring utensil
- Stencil or cardboard cutouts for designs
Steps:
Prepare Your Work Area
Select a well-ventilated space with good air circulation. If working indoors, consider opening windows and using a fan to enhance ventilation. Lay down a plastic sheet or use garbage bags to completely cover your work surface.
Ensure it’s large enough to accommodate the sweatshirt and that it’s positioned on a stable, flat surface. This protective layer will prevent any accidental bleach spills or splatters from damaging your workspace.
Prepare the Sweatshirt
Before diving into the bleaching process, it’s crucial to start with a clean and thoroughly dry sweatshirt. Wash it with mild detergent, rinse it well, and then allow it to air dry completely.
This ensures there are no residues of dirt, oils, or chemicals that might interfere with the bleaching process. Check for any stains or spots and treat them if necessary before proceeding.
Create Your Design
Get creative with your design! Whether you’re aiming for a classic tie-dye pattern or something entirely unique, plan out where you want the bleach to lighten the fabric.
Consider using various folding, twisting, or binding techniques with rubber bands to achieve different effects. For precise designs, you can even use stencils or cardboard cutouts to mask off specific areas.
Mix the Bleach Solution
With your plastic gloves on, carefully measure out the bleach and water.
Remember to always add the bleach to the water, not the other way around, to ensure safe handling. The bleach-to-water ratio will determine the intensity of the bleaching effect.
When you’re uncertain, it’s better to start with a more diluted solution and gradually increase the bleach concentration if needed.
Apply the Bleach
Using plastic squeeze bottles or spray bottles, apply the bleach solution to the sweatshirt.
Be deliberate and focused, ensuring that the bleach is applied evenly to the desired areas. When you’re working with a specific pattern, take your time to follow the design.
For a more freeform approach, let your creativity flow. Be careful not to oversaturate any one area, as this can lead to uneven results.
Allow the Bleach to React
After applying the bleach, let the chemical reaction take place. Keep a close eye on the fabric, observing how it lightens over time. This process typically takes a few minutes, but it’s essential to monitor it closely.
If you’re aiming for a subtle effect, don’t let the bleach sit for too long. Conversely, if you want a more dramatic change, you can let it react a bit longer.
Rinse and Neutralize
Once the desired level of lightening is achieved, carefully remove the rubber bands, ensuring you don’t splatter any bleach onto unintended areas.
Rinse the sweatshirt thoroughly with cold water. This not only removes excess bleach but also halts the bleaching process. Continue rinsing until the water runs clear and you can no longer detect the smell of bleach.
Wash and Dry
After rinsing, wash the sweatshirt separately in cold water with a mild detergent. This step is crucial to remove any remaining bleach residue.
Follow the garment care label instructions for washing. Once washed, either allow the sweatshirt to air dry or use a dryer according to the care label.
Enjoy Your Bleach Tie-Dye Sweatshirt
Once dry, you’ll have a striking bleach tie-dye sweatshirt that reflects your personal style.
Pair it with your favorite bottoms for a fashionable and uniquely customized outfit. Admire your handiwork and take pride in the one-of-a-kind fashion piece you’ve crafted!
Common Folding Techniques for Bleach Tie-Dye
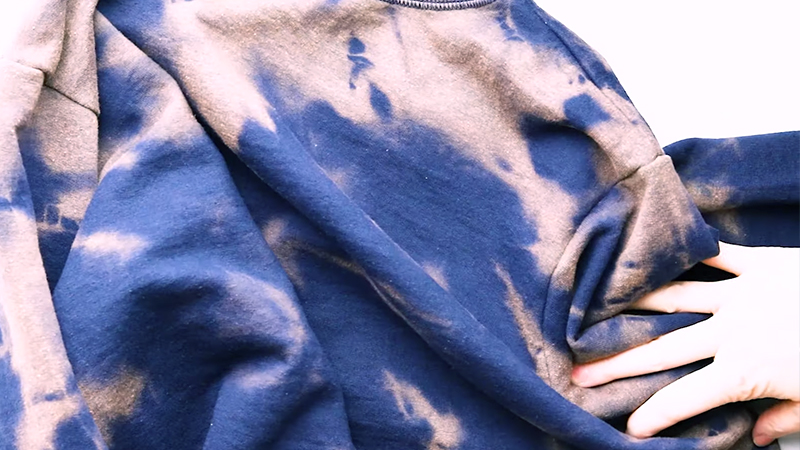
Before delving into the world of bleach tie-dye, it’s essential to understand the various folding techniques that can help you create intricate and captivating patterns.
These techniques serve as the foundation for your design, determining how the bleach interacts with the fabric.
Here are some of the most commonly used folding methods:
Accordion Fold
The accordion fold is achieved by systematically folding the fabric back and forth, creating a series of parallel pleats.
This method provides a structured canvas for your bleach tie-dye design, resulting in clean, geometric lines. Depending on the width and spacing of the folds, you can achieve a variety of effects, from narrow stripes to broader bands of color.
Spiral Fold
The spiral fold is a dynamic technique that begins with pinching the fabric’s center and twisting it into a spiral shape.
This creates a mesmerizing, radiating pattern that emanates from the center point. The resulting design is organic and visually captivating, making it a popular choice for creating eye-catching focal points on a sweatshirt.
Crinkle Fold
The crinkle fold embraces a more freeform approach. By crumpling the fabric randomly, you create a dynamic, irregular pattern.
The resulting design is characterized by its unpredictability and texture, giving your sweatshirt a casual, artistic vibe.
Diamond Fold
Folding the fabric diagonally, you create a series of diamond-shaped sections. This method results in a structured, symmetrical pattern that adds a touch of elegance to your bleach tie-dye design.
Depending on the size and orientation of the diamonds, you can achieve different visual effects.
Burst Fold
Similar to the spiral fold, the burst fold starts from a central point. However, instead of twisting, you fan-fold the fabric outward.
This creates a striking starburst effect, with lines radiating from the center. It’s a dynamic technique that adds a burst of energy to your sweatshirt design.
Fan Fold
The fan fold involves folding the fabric like an accordion, but in a single direction. This creates a set of wedge-shaped sections.
This technique is perfect for creating dynamic, fan-like patterns that can add movement and flair to your bleach tie-dye design.
Circle Fold
Achieved by folding the fabric into a circular shape, this technique results in concentric rings or circles when dyed. The resulting design is mesmerizing and hypnotic, making it a great choice for creating visually engaging patterns on your sweatshirt.
Strip Fold
The strip fold technique involves folding the fabric into narrow strips, either horizontally or vertically.
This creates a pattern of bold, parallel lines that can add a sense of structure and rhythm to your bleach tie-dye design.
Triangle Fold
Folding the fabric into triangles creates a series of triangular shapes on the sweatshirt.
When dyed, this technique results in an angular, geometric design that can add a modern and edgy touch to your bleach tie-dye creation.
Heart Fold
The heart fold is a specialized technique that involves folding the fabric to create a heart shape.
It adds a romantic and whimsical touch to your bleach tie-dye design, making it perfect for expressing love and creativity through your clothing.
Ways to Create Different Patterns on the Sweatshirt
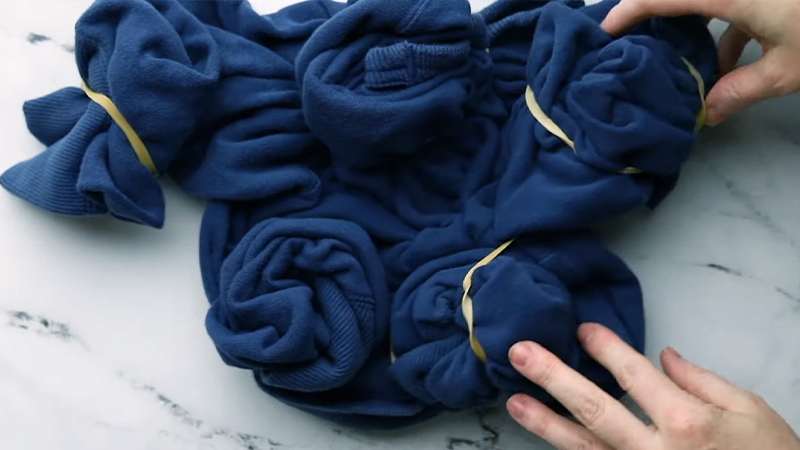
When it comes to bleach tie dye, the possibilities are virtually endless. With the right techniques, you can achieve an array of captivating patterns on your sweatshirt.
Here are some methods to consider, each offering its own unique visual effect:
Bleach Splatter Technique
Embrace your inner artist by using an old toothbrush or a paintbrush to splatter bleach onto the sweatshirt.
This technique offers a dynamic, spontaneous effect, resembling a starry night sky or a spray-painted graffiti style. Vary the intensity of the splatters for a more textured and layered appearance.
Stenciling
Stenciling allows for precise and intricate designs on your sweatshirt. Cut out a stencil from cardboard or plastic, then securely position it on the fabric.
Gently apply the bleach around the stencil using a spray bottle or sponge. This technique is perfect for creating sharp, well-defined patterns or images.
Reverse Tie-Dye Technique
Departing from traditional tie-dyeing, scrunching, or crumpling the fabric before applying bleach creates an entirely unique effect.
The bleach interacts with the fabric’s natural folds and wrinkles, resulting in an organic, abstract pattern. This technique is excellent for achieving a more unconventional and artistic look.
Ombre Effect
Master the art of gradient coloring by submerging the bottom portion of your sweatshirt into a stronger bleach solution. Gradually lift it out, allowing the bleach concentration to decrease as you move upward.
This method creates a seamless transition from a deeply bleached area to a subtler, untouched section, resulting in a stunning ombre effect.
Bleach Pen or Brush
Exercise precision and control with a bleach pen or fine-tipped brush. Use it to draw intricate designs, and patterns, or even write words or phrases.
This method enables you to add fine details and embellishments, making it ideal for creating personalized and intricate designs on your sweatshirt.
Rubber Band Resists
Employ rubber bands to bind sections of the sweatshirt. The bound areas will remain unbleached, creating distinct lines or shapes against the bleached background.
Experiment with different binding techniques, such as accordion or diagonal folds, to achieve varying patterns and effects.
Marbling Technique
Create an elegant, marbled effect by crumpling the sweatshirt and applying bleach in a swirling motion. This technique results in fluid, organic patterns reminiscent of natural stone or marble.
The unpredictable and delicate nature of marbling adds a touch of sophistication to your bleach tie-dye design.
Layered Designs
Apply bleach in stages, allowing each layer to dry before adding another. This technique creates depth and complexity, as different layers interact to produce a multi-dimensional pattern.
Experiment with different bleach concentrations and application methods to achieve a visually captivating layered effect.
Sponge or Cloth Application
Dabbing a sponge or cloth soaked in bleach onto the fabric provides a soft, mottled pattern.
This technique allows for subtle, gradual color changes and a textured appearance. It’s perfect for achieving a vintage or distressed look with a touch of artistic flair.
Freehand Artistry
Embrace your inner artist and let your creativity flow by painting or dripping bleach onto the sweatshirt freehand.
This technique offers boundless creative freedom, allowing you to craft entirely unique, one-of-a-kind designs limited only by your imagination. It’s an opportunity to express yourself and create wearable art.
Tips and Tricks for Bleaching Tie-Dye a Sweatshirt
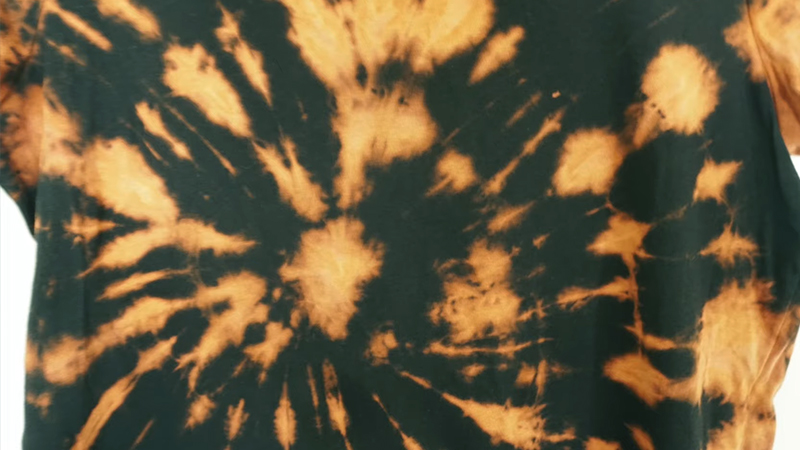
Bleach tie-dyeing a sweatshirt is a creative and personalized way to revamp your wardrobe.
While we’ve covered the basic steps, here are some additional tips and tricks to help you achieve the best results and unleash your inner tie-dye artist:
Test on Scrap Fabric
Before you start on your actual sweatshirt, it’s wise to conduct a test run on a scrap piece of similar fabric.
This not only familiarizes you with the process but also allows you to gauge how the fabric reacts to the bleach. You can experiment with different bleach concentrations and application techniques to see what yields the desired effect.
Experiment with Patterns
The beauty of bleach tie-dye lies in its versatility. Try out various folding and binding techniques to create different patterns.
For example, tight accordion folds can result in sharp, defined lines, while looser crumpling can produce a more organic, abstract design. Feel free to mix and match techniques for a truly one-of-a-kind look.
Layering Effects
To add depth and complexity to your design, consider applying bleach in layers. Start with a lighter concentration and allow it to react before adding another layer with a slightly stronger mixture.
This technique can create a nuanced, multi-dimensional effect that adds visual interest to your sweatshirt.
Controlled Splattering
For a playful, artistic touch, try introducing controlled splatters of bleach onto the fabric. Use an old toothbrush or a small brush to flick or splatter the bleach.
This can result in a speckled effect that adds character and texture to your design. Experiment with different application techniques to achieve the desired level of splatter.
Gradient Effects
To achieve a gradient or ombre effect, start by saturating one end of the sweatshirt with a more concentrated bleach solution.
Gradually dilute the bleach as you work towards the other end. This gradual transition from dark to light can create a visually striking and dynamic effect.
Protect Unintended Areas
When you have specific areas you want to keep untouched by bleach, use plastic or cardboard inserts to shield them.
This is particularly useful for creating precise designs or protecting elements like zippers, pockets, or other embellishments. Take your time to ensure these areas are properly covered before applying bleach.
Vary Bleach Concentrations
Experiment with different bleach-to-water ratios to achieve a range of effects. A higher bleach concentration will result in more dramatic lightening, while a more diluted mixture will yield a subtler effect.
This allows you to customize the intensity of the bleach tie-dye to your preference.
Blend Colors
Keep in mind how the original colors of your sweatshirt will interact with the bleach. Darker colors will lighten more dramatically, potentially creating a high-contrast effect.
Lighter colors may take on a pastel hue when bleached. Consider these interactions when planning your design for a harmonious and visually appealing result.
Patience is Key
Take your time during the application process. It’s better to start with a conservative amount of bleach and gradually add more if needed.
Rushing can lead to over-bleaching, which may be difficult to correct. Keep a watchful eye on the fabric as it reacts to ensure you achieve the desired effect.
Safety First
Always prioritize safety when working with bleach. Wear protective gloves to shield your hands and work in a well-ventilated area to minimize inhalation of fumes.
When possible, wear old clothing and consider using eye protection to ensure your safety throughout the process. Be mindful of your surroundings and take necessary precautions to create a safe workspace.
FAQs
Can I bleach tie-dye any type of sweatshirt?
While most cotton-based sweatshirts work well for bleach tie-dyeing, it’s best to avoid sweatshirts with a high synthetic fiber content as they may not react to bleach in the same way.
Is there a specific bleach-to-water ratio I should use?
The ratio depends on the intensity you desire. A common ratio is 1 part bleach to 1 part water for a medium effect.
How can I protect areas I don’t want to bleach?
Use plastic or cardboard inserts to shield specific areas. This is particularly useful for creating precise designs or protecting elements like zippers, pockets, or other embellishments.
Can I mix different folding techniques for one sweatshirt?
Absolutely! Mixing folding techniques allows for endless creativity and unique patterns.
How do I care for a bleach tie-dye sweatshirt?
Wash it separately in cold water with mild detergent. Avoid using harsh chemicals or bleach in future washes, and consider air drying to preserve the integrity of the design.
Wrap Up
The art of bleach tie-dyeing is a captivating way to breathe new life into a simple sweatshirt, infusing it with your unique style and creative flair.
Through a combination of folding techniques, precision in application, and imaginative experimentation, you can transform a plain garment into a personalized masterpiece.
The diverse array of patterns and effects available empowers you to craft a sweatshirt that is truly one-of-a-kind, reflecting your individuality.
This DIY journey not only yields a stunning fashion statement but also provides a creative outlet where each step is an opportunity for self-expression. So, embrace the bleach, let your imagination soar, and enjoy the process of creating wearable art!
Leave a Reply