Cross stitch embroidery is a timeless and creative craft that allows you to transform plain fabric into stunning works of art. Whether you’re a beginner looking to start a new hobby or an experienced stitcher seeking fresh inspiration, this guide will help you master the art of cross stitch.
In this comprehensive tutorial, we’ll explore how to do cross stitch embroidery, from selecting the right materials and understanding essential stitches to creating intricate patterns and finishing your projects with finesse.
You’ll discover the joy of turning colorful threads into beautiful designs that can be framed, gifted, or cherished as heirlooms. We’ll cover everything you need to know, including the basic tools, types of fabric, and how to read cross stitch patterns.
Along the way, you’ll learn various stitching techniques, tips for working with different thread counts, and how to correct common mistakes. Let’s get started on this creative journey together!

How to Do Cross Stitch Embroidery?
Cross stitch embroidery is a creative and enjoyable craft that allows you to create intricate designs on fabric using colored threads. Here’s a step-by-step guide on how to do cross stitch embroidery:
Gather Your Materials
- Cross stitch fabric (usually Aida fabric, which has evenly spaced holes)
- Embroidery hoop (optional but helpful for keeping fabric taut)
- Embroidery floss (thread) in various colors
- Cross stitch pattern (either printed or downloaded)
- Embroidery needles (usually with blunt tips)
Start with a Simple Pattern
If you’re a beginner, begin with a straightforward pattern that has fewer colors and simple shapes. Cut the fabric to the desired size, leaving some extra for framing or finishing.
If using an embroidery hoop, place the fabric in it and tighten the hoop to keep the fabric taut.
Thread Your Needle
Separate the embroidery floss into strands. Cross stitch typically uses 2 strands of floss, but this can vary depending on the fabric and pattern.
Begin Stitching
Refer to your pattern for guidance on where to start. Cross stitches are typically worked from the center outward. Bring the needle up from the back of the fabric to the front at the starting point.
Make Cross Stitches
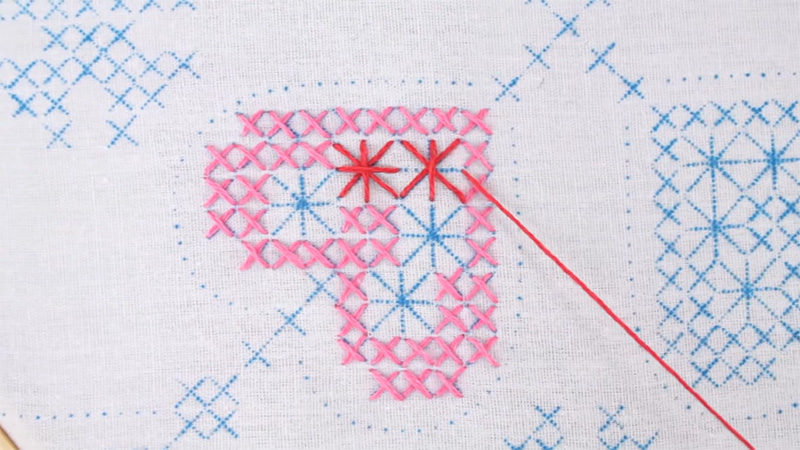
Cross stitches are composed of two diagonal stitches that form an “X.” To make a cross stitch, bring the needle up from the back at the bottom-left corner of the square.
Insert the needle down at the top-right corner, forming a diagonal stitch. Bring the needle back up at the bottom-right corner. Insert the needle down at the top-left corner, completing the “X.”
Continue Stitching
Follow the pattern’s instructions, stitching one square at a time. Use a different color of embroidery floss for each section of the pattern as indicated.
Finishing
Once you’ve completed your design, secure the loose ends of thread on the back of the fabric by weaving them through existing stitches. If using an embroidery hoop, remove the fabric carefully.
Framing or Displaying
You can frame your cross stitch in a hoop, frame, or create a decorative item like a pillow or ornament.
Practice and Experiment
Cross stitch is a skill that improves with practice, so don’t be discouraged by initial mistakes. Experiment with different patterns, fabrics, and colors to create unique and personalized pieces.
Remember, cross stitch embroidery is a relaxing and rewarding craft that allows you to express your creativity. Enjoy the process and take pride in the beautiful creations you make!
How to Avoid Holes While Doing a Cross Stitch?

Avoiding holes while doing a cross stitch requires attention to detail and proper technique. Here are some tips:
Use the Right Fabric
Select a fabric specifically designed for cross stitching, such as Aida fabric. It has a grid-like weave that makes it easier to count and maintain uniform stitches. Inspect the fabric to ensure it’s evenly woven with no irregularities or holes that could affect your stitching.
Tension Matters
Be mindful of the tension in your stitches. Avoid pulling the thread too tightly, as this can distort the fabric and create unsightly puckering. Conversely, avoid leaving the thread too loose, as this can result in gaps between stitches.
Start and End Securely
When beginning a new thread, anchor it securely on the reverse side of your fabric. This prevents it from slipping out of place as you work.
At the end of a thread, secure it by weaving it through existing stitches on the reverse side, ensuring it won’t come undone over time.
Count Carefully
Double-check your pattern and the fabric to count your stitches accurately. Miscounting can lead to uneven spacing or misalignment of your design elements.
Use the Right Needle
Choose a needle that matches the fabric and thread thickness you’re using. A needle that’s too large can create larger holes, while a too-small needle may cause difficulty in threading or damage to the fabric.
Don’t Skip Stitches and Maintain Consistency
Complete each stitch in the correct order, following the pattern precisely. Skipping stitches can lead to gaps in your design. Ensure that all your stitches are in the same direction and at the same angle for a uniform appearance.
Use a Hoop or Frame
A hoop or frame helps keep your fabric taut and flat, preventing wrinkles and distortion while you work. It also reduces the strain on your hands and wrists, allowing for more precise stitching.
Stitch Mindfully and Practice
Pay close attention to your work while stitching, especially when changing colors or following intricate patterns. Cross stitching improves with practice. As you gain experience, your stitches will become neater and more consistent.
Remember, achieving clean and hole-free cross stitch projects takes time and dedication. These tips, when applied diligently, will help you create beautiful and precise cross stitch designs.
Popular Cross Stitch Patterns

Want to make something eye-catchy? Let’s elaborate on the popular cross stitch pattern themes that are easy and trendy:
Floral Designs
Floral cross stitch patterns can include various types of flowers like roses, daisies, and lilies. These designs often incorporate vibrant colors and intricate details to mimic the beauty of real flowers.
Floral patterns are versatile and can be adapted to fit different project sizes, from small bookmarks to large wall hangings.
Geometric and Modern Patterns
Geometric cross stitch patterns feature shapes like triangles, squares, and hexagons arranged in visually pleasing ways. Modern cross stitch often uses bold, contrasting colors and clean lines to create contemporary art pieces.
These patterns are popular for their simplicity and ability to complement modern interior decor.
Quotes and Typography
Cross stitching quotes and typography allows for personalization and expression. Crafters can choose meaningful quotes, song lyrics, or humorous phrases to incorporate into their projects. Different fonts and decorative elements are used to enhance the visual appeal of the text.
Animals
Animal-themed cross stitch patterns range from realistic portrayals to whimsical and cute depictions. Popular choices include pets like cats and dogs, as well as wildlife such as birds and butterflies.
Animal patterns are often chosen for their charm and ability to resonate with animal lovers.
Seasonal and Holiday Themes
Cross stitching seasonal and holiday motifs is a tradition for many crafters. Christmas patterns can feature ornaments, Santa Claus, and nativity scenes.
Halloween may include spooky motifs like witches, pumpkins, and bats. Easter patterns often showcase bunnies, eggs, and springtime flowers.
Landscape and Scenery
Landscape cross stitch patterns can capture the beauty of nature, landmarks, or cityscapes. These designs often require attention to detail and use a wide range of thread colors to create realistic scenery. They are popular for framing and displaying as art pieces.
Fandom and Pop Culture
Patterns inspired by pop culture, movies, TV shows, and books cater to fans’ passions. Crafters can create cross stitch art featuring characters, symbols, and iconic scenes from their favorite media. These patterns are a creative way to showcase fandom pride.
Traditional Samplers
Traditional samplers are historical cross stitch patterns that showcase various stitches, motifs, and often include alphabets and dates. They have a timeless charm and are sometimes used for skill-building and historical recreation.
Baby and Nursery Themes
Cross stitching for babies often includes patterns for birth announcements, baby animals, and nursery decor. Crafters create unique and sentimental gifts for expecting parents or decorate their own nurseries.
Kitchen and Food Themes
Kitchen and food-related patterns are ideal for creating decorative kitchen items, such as dish towels, aprons, and pot holders. They may feature common kitchen utensils, fruits, vegetables, or even elaborate dishes.
Exploring these diverse themes in cross stitch allows crafters to express their creativity and create personalized, meaningful pieces of art and decor.
Remember that the popularity of specific patterns can change over time, so staying updated with current trends can help you find fresh and exciting designs.
FAQs
To start cross stitching as a beginner, you’ll need basic supplies like Aida fabric, embroidery floss, a needle, and a hoop or frame. Find a simple pattern, follow instructions carefully, and practice basic stitches like the cross stitch and backstitch.
Cross stitch is a specific form of embroidery. The main difference is in the stitches used. Cross stitching primarily involves X-shaped stitches (cross stitches) on a grid-like fabric, while embroidery encompasses a wide range of stitching techniques.
Fabric count refers to the number of fabric threads per inch. A lower count (e.g., 14-count Aida) has larger squares, making it easier for beginners. Higher counts (e.g., 18-count Aida) have smaller squares and are suitable for intricate designs.
After completing your cross stitch project, you can finish it by framing it in a decorative frame or mounting it in a hoop. Alternatively, you can turn it into a pillow, tote bag, or wall hanging.
To prevent knots and tangles, use shorter lengths of thread (usually about 18-24 inches) and thread your needle carefully. If your thread starts to twist, let the needle dangle to unwind naturally. Avoid pulling the thread too tight to reduce the chances of it knotting up.
Conclusion
Cross stitch embroidery is a delightful and rewarding craft that allows you to express your creativity and create unique, handmade treasures. We hope this guide has provided you with the knowledge and confidence to embark on your cross-stitching journey.
Remember, practice makes perfect, so don’t be discouraged if your first stitches aren’t flawless. Over time, your skills will improve, and you’ll develop your own style and preferences.
Whether you’re stitching for relaxation, to personalize gifts, or to decorate your home, the possibilities with cross stitch are endless.
As you continue to explore this timeless art form, don’t forget to share your creations with fellow stitchers and seek inspiration from the rich world of cross-stitch patterns and designs.
Most importantly, enjoy the process, savor the satisfaction of completing each project, and take pride in the beautiful pieces you create. Happy stitching!
Leave a Reply