In the world of personalized crafting with Cricut Design Space! Making a monogram in Cricut Design Space is a delightful blend of creativity and technology, allowing you to infuse your projects with a unique, individual touch.
Monograms, those beautifully stylized combinations of initials, are versatile and can be used to adorn clothing, accessories, home decor, and gifts.
In this guide, we’ll take you through the step-by-step process of crafting a monogram, from selecting the perfect font to precision resizing and choosing the right materials.
Whether you’re a seasoned crafter or just starting your creative journey, Cricut Design Space provides the tools to transform everyday items into personalized treasures.

What Is a Monogram?
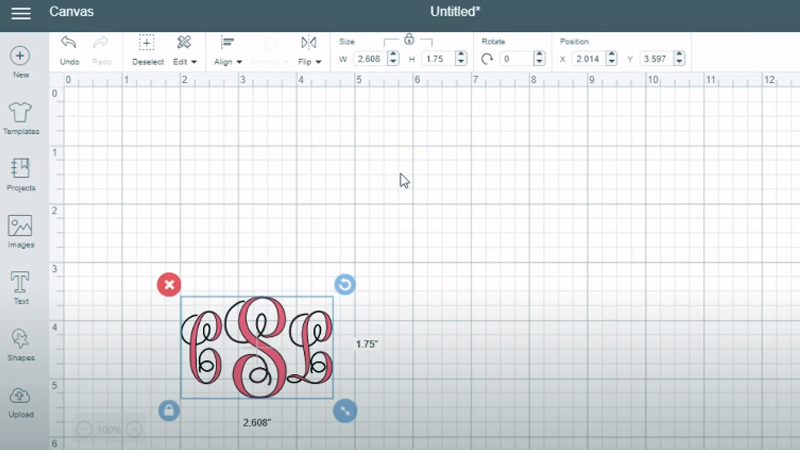
A monogram is a stylized arrangement of initials, typically used to represent a person’s name in a visually unique and decorative manner. It combines two or more letters, often the individual’s first, middle, and last initials, into a single design.
Monograms have a long history and are employed for various purposes, from personalizing belongings to adding an elegant touch to products and gifts. They’re commonly found on items like clothing, linens, jewelry, and stationery.
Monograms can range from simple and modern to intricate and ornate, reflecting the individual’s taste and style. This timeless form of personalization adds a distinctive and sophisticated flair to a wide array of items and occasions.
How to Make a Monogram in Cricut Design Space?
Creating a monogram in Cricut Design Space is a fun and creative way to personalize your projects.
Whether it’s for a wedding, home decor, or a gift, monograms add a touch of elegance and uniqueness.
Follow these steps to make a monogram using Cricut Design Space:
Gather Your Materials
Before you begin, make sure you have all the necessary materials:
- Cricut cutting machine
- Computer or mobile device with Cricut Design Space software
- Vinyl or iron-on material of your choice
- Standard or fine-point blade
- Cutting mat
- Weeding tools
Open Cricut Design Space
Open up Cricut Design Space on your computer or mobile device. If you’re using a computer, you can access it through your preferred web browser.
Log in to your Cricut account. If you’re new to Cricut, you’ll need to sign up, but the process is quick and easy.
Create a New Project
Click on “New Project” to initiate a new canvas in Cricut Design Space. This will provide you with a blank area to work on your monogram design.
Don’t be afraid to explore the various tools and options available in the design space.
Select a Monogram Font
On the left sidebar, find and click on the “Text” option. This action will insert a text box onto your canvas.
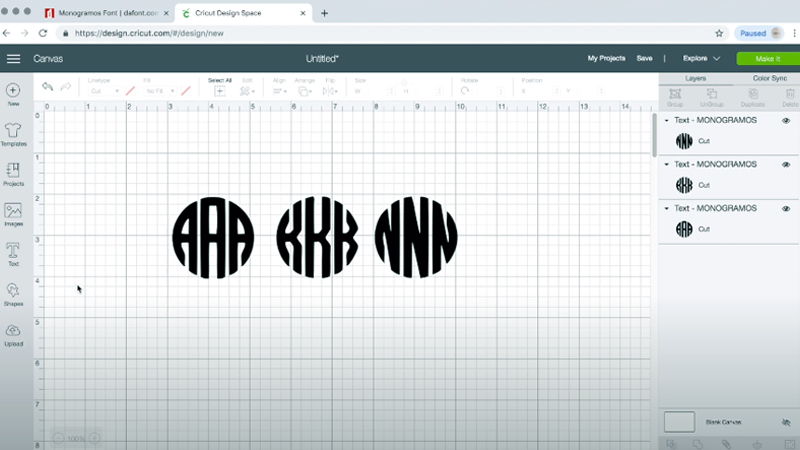
Type in the initials you want to use for your monogram in the provided text box. For instance, if the initials are “ABC,” type them in just like that.
Choose a Monogram Font
Select the text you just added, and then go to the font dropdown menu. This is where you’ll find an assortment of fonts available in Cricut Design Space.
Take your time browsing through the options and select a monogram-style font that resonates with you. This choice will significantly influence the overall appearance of your monogram.
Weld the Initials
Creating a seamless monogram requires joining the initials together. Select the text, and then click the “Weld” button located in the bottom right corner of the Layers panel.
This welding process ensures that the letters are treated as a single unit, which is crucial for cutting.
Resize and Position
With your monogram created, you can now fine-tune its size and position. Click and drag the corner handles to adjust the size to your liking.
Utilize the arrow keys for precise positioning on the canvas. Take your time here to achieve the exact look you want.
Choose Your Material and Load It
Click on the “Make It” button in the upper right corner. This will take you to the next screen where you’ll select the type of material you’ll be cutting.
Choose the appropriate material from the dropdown menu. Follow the prompts to load the corresponding cutting mat into your Cricut machine.
Cut Your Monogram
Once your material is loaded and ready, press the “Go” button on your Cricut machine to start the cutting process.
Before you do, it’s always wise to double-check your settings (such as blade type and pressure) to ensure they’re correct for your chosen material.
Weed and Apply
After the cutting is complete, carefully remove any excess material from around your monogram.
When you’re using vinyl, weeding tools can be handy for this. If it’s an iron-on project, make sure you’ve mirrored the image before cutting. Follow the provided instructions for applying the iron-on material to your fabric or surface.
Troubleshooting Common Issues

Using Cricut Design Space can be an incredibly creative and rewarding experience. However, like any software or tool, you might encounter some hiccups along the way.
Here’s a guide to help you troubleshoot some common issues you may come across:
Connection Problems
- Issue: Your machine isn’t connecting to Cricut Design Space.
- Solution: Ensure your Cricut machine is powered on and properly connected to your computer or device. Check your internet connection and make sure it’s stable. Log out of Design Space, restart your computer or device, and log back in.
Cut Quality Issues
- Issue: Your cuts aren’t clean or precise.
- Solution: Ensure the blade is clean and sharp. Replace it if necessary. Adjust cut settings in Design Space for the specific material you’re using. Ensure the material is properly adhered to the cutting mat.
Design Not Loading
- Issue: Your design isn’t loading in Cricut Design Space.
- Solution: Clear your browser’s cache and cookies. Check for any browser extensions that might be interfering with the loading process. Try a different browser or device.
Machine Not Responding
- Issue: Your Cricut machine isn’t moving or responding to commands.
- Solution: Check if the machine’s power source is stable. Ensure the USB or Bluetooth connection is secure. Restart both the machine and Design Space.
Image or Text Not Cutting:
- Issue: Only part of your design is cutting.
- Solution: Check if the design elements are set to “Cut” in the Layers panel. Verify that the design isn’t too large for the available cutting area.
Material Not Sticking to Mat
- Issue: The material isn’t staying in place on the cutting mat.
- Solution: Use a clean, non-greasy mat. Adjust the material settings in Design Space to match the actual material being used. Consider using a different grip mat if necessary.
Design Elements Not Aligning
- Issue: The layers of your design aren’t aligning correctly.
- Solution: Use the alignment tools in Design Space to manually adjust the layers. Double-check that the layers are properly arranged in the Layers panel.
Machine Pauses Mid-Cut
- Issue: Your machine stops cutting partway through a project.
- Solution: Ensure the machine is connected securely to your computer or device. Check for any obstructions in the machine’s path. Verify that the machine is receiving a stable power supply.
Saving and Exporting
Saving and exporting are crucial steps in any creative process, whether you’re working on documents, images, or design projects.
Here’s a brief guide on saving and exporting in different contexts:
Saving in Document Editors
- Save (Ctrl+S / Cmd+S): This command stores your current work on a local drive or cloud storage. Save regularly to prevent data loss.
- Save As: Allows you to save a copy of your file under a different name or in a different location.
Saving Images in Editing Software
- Save (Ctrl+S / Cmd+S): This preserves your project in its native format (e.g., PSD, XCF), allowing you to make further edits later.
- Export: Converts the image to a different format (e.g., JPEG, PNG) for sharing or printing. It’s best for finalized versions.
Saving and Exporting in Design Tools
- Save: Preserve your project in its original format (e.g., Cricut, AI) for future editing within the same software.
- Export: Converts the design into a usable file format (e.g., SVG, PDF) that can be shared, printed, or used in other applications.
Exporting in 3D Modeling Software
- Export: Converts the 3D model into a specific file format (e.g., OBJ, STL) that can be used in other programs or for 3D printing.
Exporting in Video Editing Software
- Export or Render: This process creates a finalized video file (e.g., MP4, MOV) from your edited project for sharing or further processing.
Saving and Exporting in Web Browsers
- Save Page As: This allows you to save a webpage to your computer, including all its elements (HTML, images, etc.)
- Bookmark or Favorite: Saves a link to a webpage for quick access. It doesn’t save the actual content.
FAQS
How Do I Create a Monogram in Cricut Design Space?
To create a monogram in Cricut Design Space, open a new project, add text with your desired initials, choose a monogram-style font, and then weld the letters together for a seamless design.
What Can I Use a Monogram for in Cricut Design Space?
Monograms can be applied to a wide range of projects, including clothing, accessories, home decor, gifts, and more.
Can I Resize and Customize My Monogram in Cricut Design Space?
Yes, in Cricut Design Space, you can easily resize and customize your monogram.
What Materials Can I Use to Make a Monogram with Cricut?
You can create monograms using various materials, including vinyl for decals, iron-on for fabric projects, cardstock for paper crafts, and more.
Do I Need Special Skills to Make a Monogram in Cricut Design Space?
No, you don’t need advanced skills to make a monogram in Cricut Design Space.
To Recap
Crafting a monogram in Cricut Design Space opens up a world of creative possibilities.
Through intuitive steps, from selecting fonts to precision resizing, users can personalize a diverse range of items. The weld feature ensures a seamless, unified design, while material selection ensures suitability for various projects.
With this accessible platform, customization becomes effortless, allowing individuals to add a distinct touch to clothing, accessories, gifts, and home decor.
Cricut Design Space empowers both beginners and seasoned crafters to embark on unique monogramming ventures, turning ordinary items into cherished, personalized treasures. It’s a tool that combines technology with artistry, offering endless opportunities for self-expression.
Leave a Reply