Sewing a circle onto fabric is a versatile and creative technique that elevates the world of textile crafts.
Whether you’re embellishing a garment, adding a decorative touch to home decor, or crafting intricate appliqué designs, the ability to sew circles seamlessly is a valuable skill.
This process requires careful consideration of fabric choice, precise cutting, and the selection of appropriate tools and techniques.
In this guide, we’ll delve into the step-by-step process of sewing circles onto fabric, offering insights into best practices, helpful tips, and precautions to ensure your circular additions are not only visually appealing but also durable and well-crafted.

How to Sew a Circle Onto Fabric?
Sewing a circle onto fabric may seem like a challenging task, but with the right techniques and a bit of practice, it can be quite manageable.
Whether you’re adding decorative appliqués, patches, or creating unique designs, here’s a step-by-step guide on how to sew a circle onto fabric:
Materials You’ll Need
- Fabric with the circle to be sewn (base fabric)
- Fabric for the circle (appliqué fabric)
- Scissors
- Fabric pencil or chalk
- Pins
- Sewing machine or hand-sewing needle
- Thread that matches the appliqué fabric
- Iron and ironing board (optional)
Steps to Sew a Circle onto Fabric:
Prepare Your Fabric
Lay your fabric flat on a clean and smooth surface, ensuring it’s free of any dust or debris. Smooth it out to eliminate any wrinkles, as a smooth base makes sewing more precise and easier.
Cut Out the Circle
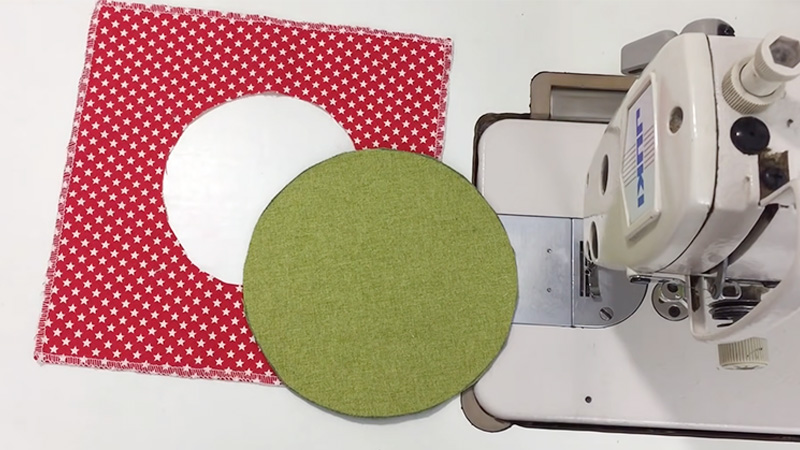
If your circle isn’t already cut out, create a template using a circular object or a compass. Place the template on your fabric and carefully cut out the circle using fabric scissors. Pay attention to making neat, even edges.
Iron the Fabric
Use an iron to press the fabric circle. This step removes any remaining wrinkles and creates a smooth surface for sewing. It also helps set any creases that may have formed while cutting.
Pin the Circle in Place
Take care to ensure the circle is centered and properly aligned.Carefully position the fabric circle on the main fabric, ensuring it’s centered and aligned precisely with your intended design. Secure it in place with pins, spacing them evenly along the circle’s edges.
Thread Your Machine or Needle
Choose a thread color that complements your fabric, and thread your sewing machine or needle meticulously. Make sure the thread is securely knotted at the end to prevent unraveling during sewing.
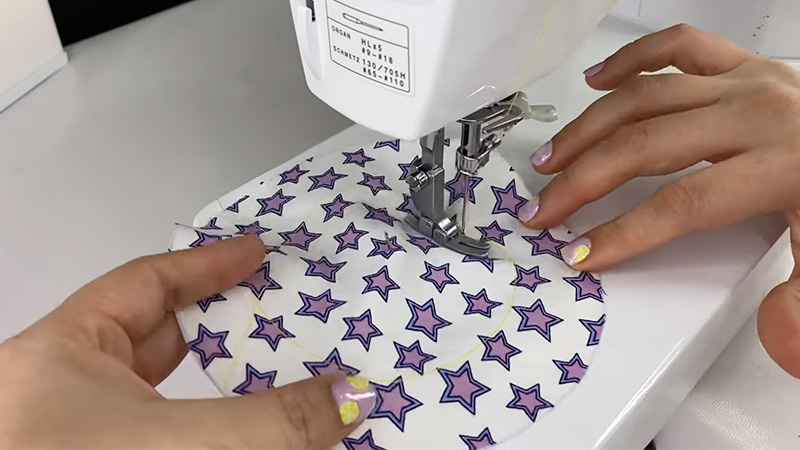
Sew Along the Edge
If using a sewing machine, set it to a straight stitch with an appropriate stitch length (typically around 2-2.5mm).
Begin sewing from the edge of the fabric circle, making sure to backstitch at the beginning to firmly secure the thread.
When hand-sewing, start from the underside of the fabric and bring the needle up through both layers to hide the knot.
Sew Slowly and Carefully
As you sew, keep the stitches even and maintain a consistent seam allowance. Use both hands to guide the fabric, and when you reach a curved section of the circle, sew slowly and pivot the fabric as needed to maintain the circular shape.
Backstitch at the End
Once you’ve completed sewing around the entire circle, reinforce the stitching by backstitching a few stitches. This step is crucial as it prevents the thread from loosening and ensures durability.
Remove the Pins
Gently and cautiously remove each pin from the fabric as you progress. Take your time to prevent any accidental tugging or damage to the stitches, ensuring the finished piece looks impeccable.
Press the Circle
Use your iron to press the fabric circle again. This step helps set the stitches and gives your work a polished appearance. It also ensures that the circle lies flat and adheres seamlessly to the main fabric.
How Do You Add Some Decorations to Your Circle?

Adding embellishments to a fabric circle can enhance its appearance and make it more visually appealing. Here are steps on how to add embellishments to your fabric circle:
Plan Your Design
Before you start adding embellishments, plan out your design. Consider the placement and arrangement of the embellishments on the fabric circle. This step will help you achieve the desired look.
Sew or Glue Embellishments
Depending on the type of embellishments you’re using, you can either sew or glue them onto the fabric circle.
Here’s how to do both:
Sewing
If you’re using beads, sequins, or appliqué pieces, thread a sewing needle with matching thread and secure one end with a knot.
Sew through the fabric from the back, bringing the needle up to the front where you want to attach the embellishment.
Thread the embellishment onto the needle, then sew it back through the fabric to secure it. Repeat this process for each embellishment.
Gluing
For fabric paint or heat-transfer embellishments, follow the manufacturer’s instructions on the packaging. Apply a small amount of fabric glue to the back of the embellishment or use a craft glue suitable for the fabric.
Press the embellishment onto the fabric circle, ensuring it adheres securely. If using fabric paint, use a small paintbrush to apply the paint to the desired design and allow it to dry according to the instructions.
Consider Layering
If you’re using multiple types of embellishments, consider layering them to create depth and dimension in your design. For example, you can layer sequins over fabric paint or add embroidery on top of appliqué pieces.
Secure Loose Ends
If you’ve sewn embellishments, make sure to secure any loose thread ends by tying knots on the back of the fabric or by using a small amount of fabric glue to prevent them from unraveling.
Let It Dry (if applicable)
If you’ve used glue or fabric paint, allow the embellishments to dry completely before handling the fabric circle.
Finishing Touches
Once your embellishments are securely in place and any glue or paint has dried, you can further enhance the circle by ironing it (if safe for the embellishments) or by adding additional embroidery or decorative stitching around the embellishments for added detail.
Precautions for Sewing a Circle Onto Fabric

When sewing a circle onto fabric, it’s essential to take certain precautions to ensure a successful and hassle-free sewing experience.
Here are some important precautions to keep in mind:
Fabric Compatibility
The choice of fabric for your circle should be compatible with the main fabric. Consider factors such as weight, stretch, and texture.
Ensure that both fabrics work well together to prevent any issues during the sewing process.
Pin Placement
When pinning the fabric circle to the main fabric, take care in pin placement. The pins should be inserted perpendicular to the fabric to hold it securely without causing distortion. Evenly spaced pins help maintain the circle’s shape during sewing.
Seam Allowance
Consistent seam allowance is crucial when sewing around the edge of the circle. A uniform seam allowance ensures that your stitches are evenly spaced and that the circle lies flat on the fabric without bunching or puckering.
Sewing Machine Settings
If using a sewing machine, adjust the machine settings appropriately. Select a stitch length suitable for the fabric and circle size.
Additionally, test the machine’s tension settings on a fabric scrap to ensure smooth stitching without puckering or looping.
Sewing Curves Slowly
When sewing along the curved edge of the circle, slow down your sewing machine or hand-sewing pace.
This cautious approach allows for better control and precision, especially when maintaining the circular shape.
Backstitching for Security
Always backstitch at the beginning and end of your stitching. This practice secures the thread and prevents it from unraveling over time.
It’s an essential step in ensuring the durability of your sewing work.
Needle Selection
Choose the appropriate needle for your fabric type. Delicate fabrics require finer needles, while thicker materials may necessitate larger needle sizes. Using the right needle helps prevent fabric damage and uneven stitching.
Thread Color Matching
Select a thread color that matches your fabric or complements your intended design. A well-matched thread color contributes to a seamless and polished appearance.
Cleaning Instructions
Cleaning instructions for fabric with a sewn-on circle or embellishments will depend on the type of fabric, the embellishments used, and any specific care guidelines provided by the manufacturer.
Here are general cleaning guidelines:
Fabric Type
Determine the fabric type of your project. Fabrics can range from delicate silk and lace to sturdy denim or cotton. Different fabrics have unique cleaning requirements, so it’s crucial to know what you’re working with.
Check Embellishments
Assess the type of embellishments you’ve added to the fabric circle. Some embellishments may not be suitable for certain cleaning methods.
For example, delicate beads or sequins may be damaged by harsh chemicals or abrasive washing.
Read Care Labels
If your fabric has care labels, read them carefully. Manufacturers often provide specific cleaning instructions that you should follow to avoid damaging the fabric or embellishments.
Spot Cleaning
For minor stains or dirt, spot cleaning may be sufficient. Use a gentle fabric cleaner or a mixture of mild soap and water.
Dab the stained area with a clean, white cloth or sponge, working from the outside of the stain toward the center to avoid spreading it.
Hand Washing
If the fabric can be hand-washed, fill a basin or sink with cold water and a mild detergent.
Gently agitate the water to create suds. Submerge the fabric, including the circle and embellishments, and gently swish it around.
Avoid excessive rubbing or twisting, especially if the embellishments are delicate. Rinse thoroughly with cold water until all detergent is removed.
Machine Washing
If the fabric is machine-washable, place it in a mesh laundry bag or pillowcase to protect the embellishments.
Use a gentle cycle with cold water and a mild detergent. Ensure the machine is set to a slow or delicate cycle to minimize agitation.
FAQs
Yes, you can sew a circle onto most types of fabric. However, choose a fabric that matches the project’s needs and consider the fabric’s weight and texture for compatibility.
A straight stitch is commonly used to sew circles onto fabric. Adjust the stitch length based on the fabric’s thickness and your project’s requirements.
You’ll need fabric scissors, a sewing machine or needle, matching thread, pins, and an iron. Optional tools include a circular template and fabric marking tools.
To prevent puckering, use an appropriate needle and thread, maintain even tension on the fabric, and sew slowly around curves.
Yes, you can enhance the fabric circle with embellishments like beads, sequins, or fabric paint.
To Wrap Up
In conclusion, sewing a circle onto fabric is a versatile skill that adds a touch of creativity to textile projects. It begins with careful fabric selection, precision cutting, and secure pinning.
Whether using a sewing machine or hand-sewing, maintaining a consistent seam allowance and sewing curves slowly are key to achieving a polished result.
Attention to thread color, needle choice, and backstitching ensures durability. While adding embellishments can enhance the circle, adhering to cleaning instructions preserves the finished work.
Mastering this technique empowers crafters to infuse fabric creations with personalized, professional-looking circular elements, elevating the art of sewing and design.
Leave a Reply