In the realm of precision crafting, mastering the “Attach” feature in Cricut Design Space is akin to wielding a fine tool. This crucial function empowers creators to maintain meticulous arrangements of design elements, ensuring flawless cuts and seamless assemblies.
Whether it’s a complex multi-layered project or a delicate vinyl design, understanding how to effectively utilize “Attach” is paramount.
This guide will walk you through each step, from selecting elements to positioning on the cutting mat, enabling you to unlock the full potential of your Cricut machine.
With this skill in your repertoire, your projects will not only be visually stunning but also impeccably crafted.

What is Attach in Cricut Design Space?
“Attach” in Cricut Design Space is a vital feature that allows users to fix the arrangement of design elements before cutting or drawing.
When you attach elements, they stay in their precise positions on the canvas, ensuring they’re cut or drawn exactly as arranged.
This is especially crucial for multi-layered or intricate designs, as it prevents individual components from shifting during the production process. Essentially, “Attach” functions like a virtual adhesive, keeping your design intact.
Without it, elements would be cut or drawn separately, potentially resulting in misalignment or errors. Mastering this feature is fundamental for achieving professional-quality projects with the Cricut machine.
How to Use Attach in Cricut Design Space?
Using the “Attach” feature in Cricut Design Space is a crucial step in ensuring that your designs cut and assembled correctly. It allows you to keep elements in a specific arrangement, preventing them from moving around on the cutting mat.
Here’s a step-by-step guide on how to use the “Attach” feature in Cricut Design Space:
Open Your Project
Begin by launching Cricut Design Space and logging into your account. Once you’re in, either select the project you’ve been working on from your list of saved projects or start a new one.
Take your time to consider the design elements you’ll be incorporating and how they will come together.
Arrange Your Design
This step is where your creativity shines. Take a moment to meticulously position each element on the canvas.
Experiment with sizes, rotations, and alignments to achieve the desired composition. This stage is crucial for the overall aesthetics of your project.
Select Elements
To maintain a specific arrangement, click and drag your cursor to create a selection box around all the elements you wish to link together.
Alternatively, you can hold down the Shift key and individually click on each element. This selection process allows you to keep these elements together during the cutting process.
Open “Layers” Panel
Direct your attention to the “Layers” panel, which is situated on the right side of the screen.
This panel provides a visual representation of all the layers in your project. It’s here that you can observe each individual element and any groups you’ve created.
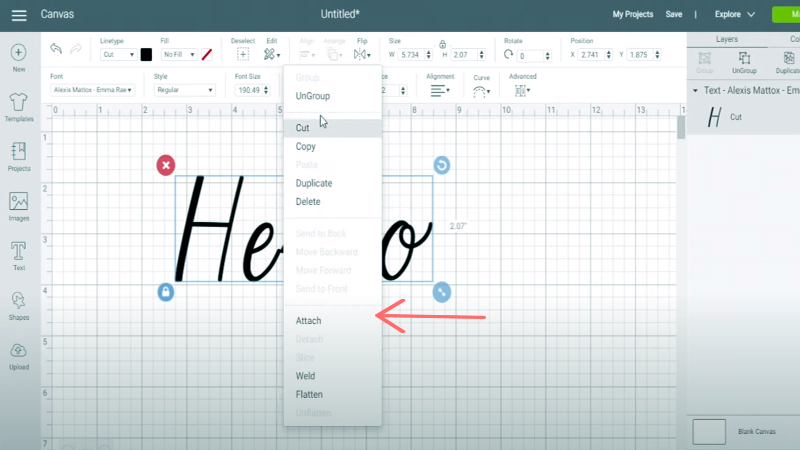
Click “Attach”
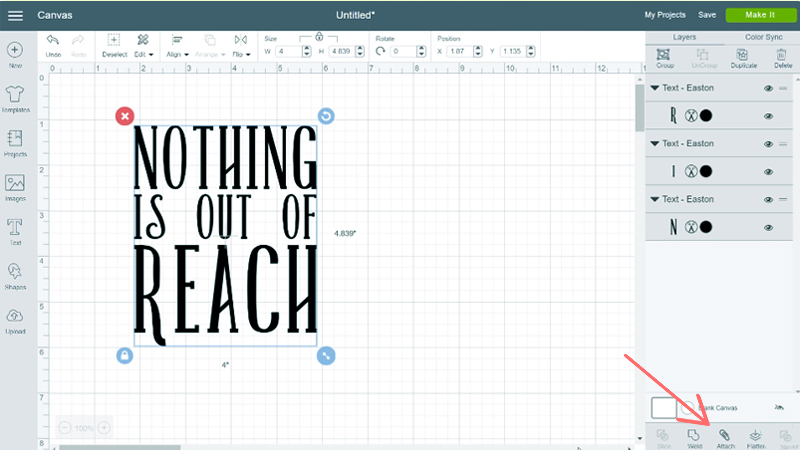
Once you’ve made your selection, navigate to the “Layers” panel and locate the “Attach” button.
By clicking this, you’re essentially merging the selected elements into one cohesive unit. In the “Layers” panel, you’ll now see this group represented as a single, solid layer.
Elements Turn Solid
In the “Layers” panel, take note of how the attached group now appears as a solid color.
This visual cue indicates that these elements are now considered one unit. This is crucial, as it informs the cutting machine to process these elements together.
Position on Mat
Carefully drag the attached design to your preferred position on the virtual cutting mat.
Consider the size of your material and how you can optimize space. This thoughtful placement helps conserve material and ensures your project is cut accurately.
Click “Make It”
When you’re satisfied with the placement on the mat, it’s time to move forward. Click the “Make It” button located in the upper-right corner of the screen.
This action takes you to the preparation phase, where you’ll configure settings before sending your design to the Cricut machine.
Follow Cutting Instructions
Pay close attention to the on-screen instructions. Load your selected material into the Cricut machine, select the appropriate material settings, and confirm that the cutting tool is properly installed. Double-check all settings to prevent any mishaps during cutting.
Assemble Your Design
Once the cutting process concludes, delicately remove the material from the cutting mat.
Depending on your project, this might involve peeling away excess material (such as vinyl or paper) or meticulously detaching intricate pieces. Follow your original design to assemble the project precisely as you envisioned.
Using “Attach” for Text and Shapes

Using the “Attach” feature in Cricut Design Space is particularly useful when you want to keep text and shapes in a specific arrangement.
It ensures that they cut and stay in the intended position, allowing for precise and accurate results.
Here’s a step-by-step guide on how to use “Attach” for text and shapes:
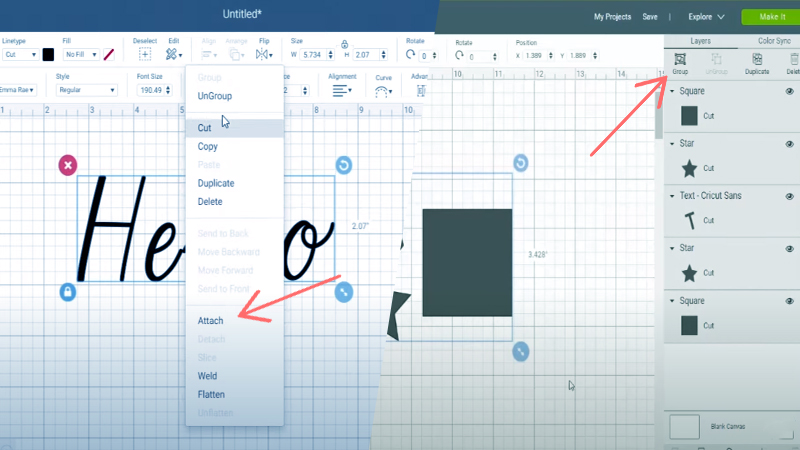
Select Your Text and Shapes
Begin by placing your text and shapes on the canvas. You can either use the text tool to type out your desired text or insert shapes from the design panel. Arrange them as you like, taking time to consider the overall design.
Highlight the Elements
To combine your text and shapes, click and drag to select all the elements you want to attach. This can include both the text and any accompanying shapes or designs.
Open the “Layers” Panel
Locate the “Layers” panel on the right side of the screen. This panel provides a visual representation of all the layers in your project, including individual elements and any groups you’ve created.
Click “Attach”
With your elements selected, click on the “Attach” button in the “Layers” panel. This action merges the selected elements into one unified group. In the “Layers” panel, you’ll now see this group represented as a single, solid layer.
Elements Turn Solid
Observe how the attached group now appears as a solid color in the “Layers” panel. This visual cue indicates that these elements are now considered one unit.
This is essential for the cutting machine to understand that these elements need to be processed together.
Position on Mat
Carefully drag the attached design to your preferred position on the virtual cutting mat.
Consider the size of your material and how you can optimize space. This thoughtful placement helps conserve material and ensures your project is cut accurately.
Click “Make It”
When you’re satisfied with the placement on the mat, click the “Make It” button located in the upper-right corner of the screen.
This action takes you to the preparation phase, where you’ll configure settings before sending your design to the Cricut machine.
Follow Cutting Instructions
Pay close attention to the on-screen instructions. Load your selected material into the Cricut machine, select the appropriate material settings, and confirm that the cutting tool is properly installed. Double-check all settings to prevent any mishaps during cutting.
Assemble Your Design
Once the cutting process concludes, delicately remove the material from the cutting mat.
Depending on your project, this might involve peeling away excess material (such as vinyl or paper) or meticulously detaching intricate pieces. Follow your original design to assemble the project precisely as you envisioned.
Difference Between Attach and Group

Understanding the distinction between “Attach” and “Group” in Cricut Design Space is crucial for effective project design and execution. These functions serve distinct purposes and have different effects on your designs.
“Attach” and “Group” are both functions in Cricut Design Space, but they serve distinct purposes:
Attach
- Purpose: The primary purpose of the “Attach” function is to ensure that selected elements maintain their exact position relative to each other when cut or drawn. This is crucial for intricate designs where the arrangement of elements is critical.
- Effect: When you attach elements, they are treated as a single unit during the cutting process. They appear as one solid color in the “Layers” panel, indicating that they will be processed together.
- Use Case: It’s ideal for projects where specific elements need to stay in a fixed arrangement, such as text overlaying an image or multiple layers of a design.
Group
- Purpose: “Grouping” is primarily for organizing and manipulating design elements on the canvas. It allows you to move, resize, and rotate multiple elements together as a single unit, but it doesn’t affect how they are cut.
- Effect: Grouped elements maintain their individual properties (e.g., color, layers) but can be manipulated together. They remain separate when sent to the cutting mat.
- Use Case: It’s useful for keeping related elements together during the design process, especially when working with complex projects.
Troubleshooting Common Issues With “Attach”
Troubleshooting common issues with the “Attach” feature in Cricut Design Space can greatly enhance your crafting experience.
Below are some typical problems and their corresponding solutions:
Elements Aren’t Staying Together After Clicking “Attach”
- Problem: When you find that after clicking “Attach,” your elements still seem to be moving independently, there might be ungrouped or unattached elements.
- Solution: Double-check that you’ve selected all the elements you want to attach. Use the selection tool to ensure you’ve encompassed everything. If necessary, select and click “Attach” again.
Unable to Click “Attach”
- Problem: The “Attach” button may be grayed out or unclickable.
- Solution: This typically occurs when no elements are selected on the canvas. Make sure you’ve chosen at least one element before attempting to attach them.
Design Doesn’t Cut Correctly
- Problem: Even after attaching elements, they still seem to move on the virtual mat, resulting in misaligned cuts.
- Solution: Ensure that you’ve positioned the attached design correctly on the virtual mat. Sometimes, if it’s too close to the edges, it may cause misalignment during the cutting process. Adjust its position and try cutting again.
“Attach” Not Working for Text
- Problem: When trying to attach text, you might find that the “Attach” function doesn’t work as expected.
- Solution: Text elements can sometimes behave differently. Convert your text to paths or shapes before attempting to attach. To do this, select the text, right-click, and choose “Convert to Path” or a similar option.
Design Seems Overlapping After Attach
- Problem: After attaching, some elements might appear to overlap or fuse together.
- Solution: This could happen if elements were too close or overlapping before attaching. Go back to your design, adjust the spacing, and reattach the elements.
“Attach” is Not Available in Complex Designs
- Problem: In intricate, multi-layered designs, the “Attach” feature may not always produce the desired outcome.
- Solution: In such cases, consider using the “Weld” feature instead. Welding permanently combines overlapping elements into one shape. This can be useful for complex designs where “Attach” may not work as intended.
Elements Disappear After Attaching
- Problem: After clicking “Attach,” it seems like some elements have vanished.
- Solution: This could happen if the elements were already attached or grouped. Check the “Layers” panel to see if the elements are already combined. If so, simply proceed with positioning and cutting.
FAQs
What does “Attach” do in Cricut Design Space?
“Attach” in Cricut Design Space is a feature that locks the arrangement of selected design elements, ensuring they stay in their exact positions during cutting or drawing.
When should I use “Attach” in Cricut Design Space?
Use “Attach” when you want specific elements to maintain their arrangement on the canvas and be cut or drawn together as a single unit. It’s essential for intricate or layered designs.
How do I attach elements in Cricut Design Space?
To attach elements, select the desired items on the canvas, go to the “Layers” panel, and click the “Attach” button.
Can I detach elements after using the “Attach” feature in Cricut Design Space?
Yes, you can detach elements by selecting the attached group in the “Layers” panel and clicking the “Detach” button. This reverts the elements to their individual layers.
Does “Attach” affect the color or style of elements in Cricut Design Space?
No, “Attach” does not change the color, style, or any other design properties of the elements. It solely ensures their position remains fixed for cutting or drawing.
Wrap Up
Mastering the “Attach” feature in Cricut Design Space opens up a world of precision and creativity.
This invaluable tool ensures that intricate designs stay impeccably arranged, guaranteeing flawless cuts and seamless assemblies.
By carefully selecting and grouping elements, and positioning them on the cutting mat, you can optimize material usage and reduce waste.
With practice, this skill becomes second nature, allowing you to embark on even more ambitious crafting projects.
Whether it’s personalized gifts, intricate paper crafts, or dazzling vinyl creations, the “Attach” feature empowers you to bring your unique vision to life with the precision and finesse that define professional-grade craftsmanship.
Leave a Reply