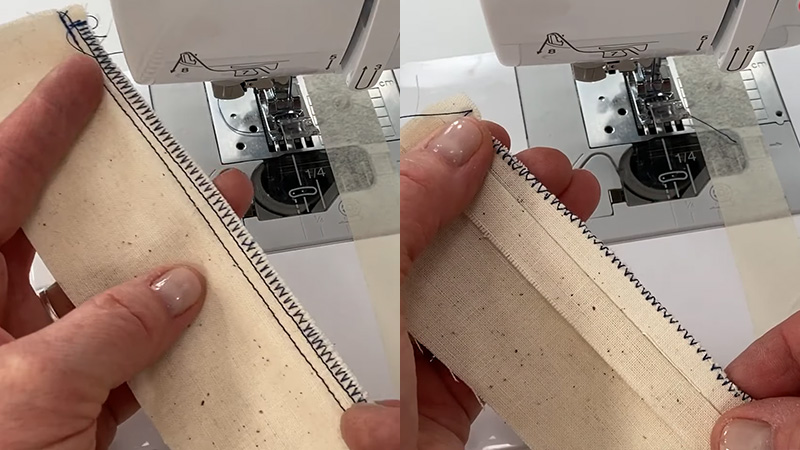
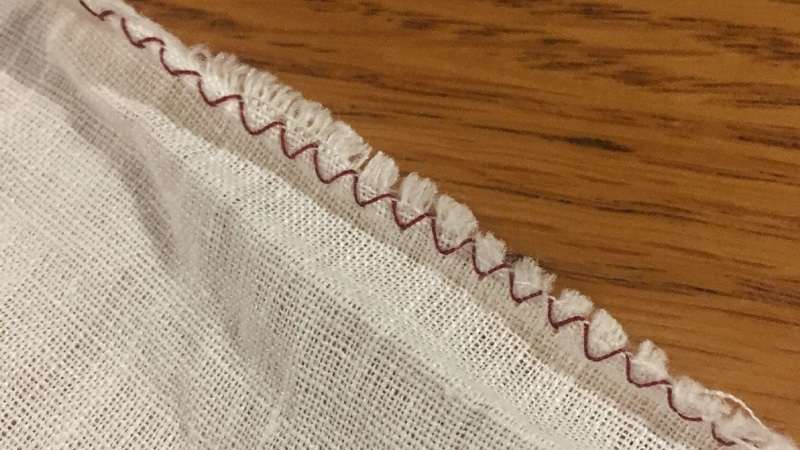
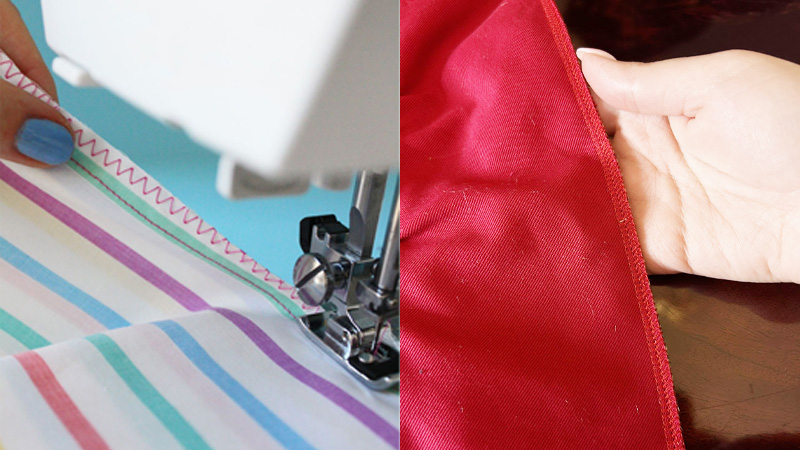
Zigzag stitches are incredibly versatile, often used for more than just decorative embellishments. One of their lesser-known but highly practical applications is as an overlocking stitch.
Overlocking, also known as serging, is a technique used to prevent fabric edges from fraying while creating a neat and professional finish. While sergers are the go-to machines for overlocking, not everyone has access to one.
In this guide, we’ll unveil how to use a zigzag stitch as an overclocking stitch to achieve the same clean and fray-resistant edges as a serger. Whether you’re working on clothing, home decor, or craft projects, mastering this technique will elevate your sewing game.
We’ll walk you through the steps to select the right stitch settings, set up your machine, and achieve impeccable overlocked edges that will give your creations that polished long-lasting look. Get ready to transform your sewing projects with the power of zigzag!

How to Use Zigzag Stitch As an Overlocking Stitch?
Using a zigzag stitch as an overlocking stitch is a practical and budget-friendly alternative to using a serger machine. In this comprehensive guide, we’ll walk you through the step-by-step process of using a zigzag stitch as an overlocking stitch to achieve clean and fray-resistant fabric edges.
Materials You’ll Need
Before you begin, gather the following materials. A sewing machine with a zigzag stitch function. Ensure it’s in good working condition, and you have a manual on hand for reference.
The fabric you wish to finish or sew. This technique works well on a variety of fabrics, including woven and knit materials. Select a thread that matches the color of your fabric.
For overlocking, it’s recommended to use polyester or nylon thread. Sharp fabric scissors for cutting your fabric and thread. A measuring tool to ensure your seam allowances are consistent.
Choose the Zigzag Stitch
On your sewing machine, select the zigzag stitch option. The zigzag stitch resembles a series of connected diagonal lines. Adjust the stitch length and width as needed; a medium-width and medium-length zigzag is a good starting point.
Prepare Your Fabric
If you’re using the zigzag stitch for seam finishing, sew your fabric pieces together with a straight stitch first, leaving a seam allowance. Press the seam open with an iron. If you’re finishing raw edges, there’s no need to sew a seam beforehand.
Position the Fabric
Place the fabric under the presser foot, aligning the fabric edge with the center of the zigzag stitch. The edge of the fabric should be slightly off-center to allow the zigzag to extend beyond the fabric edge.
Test the Stitch
Before working on your actual project, test the zigzag stitch on a scrap piece of fabric to ensure the stitch width and length are appropriate for your material. Adjust as needed until you achieve the desired finish.
Start Stitching
Begin stitching slowly, guiding the fabric along the desired edge. The zigzag stitch should straddle the edge, with one-half of the stitch on the fabric and the other half off the edge. This ensures that the fabric edge is enclosed within the zigzag stitches.
Maintain Consistent Seam Allowance
If you’re finishing seams, maintain a consistent seam allowance as you sew. Use a seam gauge or ruler to measure and guide your stitching. If you’re simply finishing raw edges, ensure the edge stays aligned with the center of the zigzag stitch.
Overlap the Starting and Ending Stitches
When you reach the end of your seam or edge, overlap the stitches slightly with the beginning stitches to secure the thread. Backstitching at the beginning and end of your stitching helps prevent unraveling.
Trim Excess Thread
Use scissors to trim any excess thread tails, leaving a small tail for added security.
After you’ve completed your zigzag overlocking, press the fabric with an iron to set the stitches and give your project a polished look.
Practice and Experiment
The key to mastering zigzag overlocking is practice. Experiment with different stitch widths and lengths to achieve the desired finish for your specific project. Keep a record of the settings that work well for different fabrics and projects.
Tips for Zigzag Overlocking Success
Use the appropriate needle for your fabric type and thickness. Use high-quality, strong thread to ensure durability. Maintain a steady sewing speed to create even and consistent stitches.
Consider using a walking foot attachment for more challenging fabrics. If you’re finishing seams, trim any excess seam allowance before overlocking to reduce bulk.
By following this guide and practicing the technique, you can use a zigzag stitch as an overlocking stitch to create clean, fray-resistant fabric edges and give your sewing projects a professional and finished appearance.
Whether you’re a beginner or an experienced sewist, mastering this skill opens up a world of possibilities for your creative endeavors.
What Other Stitches to Use for Overlocking?

While the zigzag stitch is the most common stitch used for overlocking on a regular sewing machine, there are a few other stitches that can be used for similar purposes.
These stitches may not replicate the exact results of a serger, but they can still provide effective edge finishing. Here are some alternative stitches for overlocking:
Overcast Stitch
The overcast stitch is designed to mimic the effect of an overlock or serger stitch. It creates a neat, finished edge by wrapping the thread around the fabric’s edge. Some sewing machines have a specific overcast stitch setting, while others may have a stitch that closely resembles it.
Mock Overlock Stitch and Three-Step Zigzag Stitch
Some sewing machines have a stitch pattern labeled as a “mock overlock” or “overlock look.” This stitch is designed to imitate the appearance of an overlock stitch. Three-step zigzag stitch is a wider version of the standard zigzag stitch. It covers more surface area and can be used to secure edges and prevent fraying.
Blanket Stitch
The blanket stitch is traditionally used for finishing the edges of blankets and fabrics to prevent fraying. It creates a decorative edge and can be used as an alternative to overlocking.
Satin Stitch
The satin stitch is a dense zigzag stitch that is often used for appliqué and decorative purposes. While not primarily for overlocking, it can be used to seal edges in certain situations.
Multi-Step Zigzag Stitch
Some sewing machines offer a multi-step zigzag stitch option. This stitch creates a more pronounced zigzag pattern, which can be used to secure fabric edges.
Remember, the effectiveness of these stitches for overlocking will vary depending on the fabric type and the specific requirements of your project. It’s important to test these stitches on a scrap piece of fabric before using them on your actual project to ensure they provide the desired finish.
Additionally, some sewing machines may have stitch settings specifically labeled for edge finishing or overlocking, so consult your machine’s manual for any specialized stitches that may be available.
What Is the Difference Between Zigzag and Overlock Stitch?

The key difference between a zigzag stitch and an overlock stitch lies in their purpose, appearance, and the equipment used to create them:
Zigzag Stitch
Zigzag stitches are versatile and have various applications in sewing. They can be used for decorative stitching, mending, securing seams, and finishing edges.
Zigzag stitches resemble a series of connected diagonal lines. They can be narrow or wide, with varying stitch lengths and widths, depending on the machine settings.
Zigzag stitches can be created using a standard sewing machine, which most people have at home. You don’t need a specialized machine like a serger or overlocker.
Zigzag stitches are primarily used for creating flexible and stretchable seams, preventing fabric fraying, and adding decorative elements to a project. They are suitable for a wide range of fabrics and sewing tasks.
Overlock Stitch
Overlock stitches, also known as serger stitches, are specialized for finishing raw fabric edges, creating neat and professional-looking seams, and preventing fraying. They are often used in garment construction and serging machines.
Overlock stitches are typically more intricate and involve multiple threads. They create a finished edge that encloses the fabric’s raw edge, preventing fraying.
Overlock stitches are created using a serger or overlocker machine, which is designed specifically for this purpose. Sergers have multiple thread cones and loopers that work together to create a strong, finished edge.
Overlock stitches are primarily used to finish edges quickly and neatly. They excel at preventing fraying and producing durable seams, making them ideal for garments and projects where professional finishing is required.
In summary, the main difference between a zigzag stitch and an overlock stitch is their purpose and the equipment used.
FAQs
Can I achieve a professional finish using a zigzag stitch instead of a serger?
Yes, you can achieve a professional finish using a zigzag stitch as an alternative to a serger. While a serger is specialized for overlocking, a well-adjusted zigzag stitch can create clean and fray-resistant fabric edges, giving your project a polished look.
How do I set up my sewing machine for zigzag overlocking?
To set up your sewing machine for zigzag overlocking, select the zigzag stitch option and adjust the stitch length and width to suit your fabric and project. Practice on a scrap piece of fabric to fine-tune your settings before starting your actual project.
Can I use a regular sewing needle for zigzag overlocking?
It’s recommended to use a heavy-duty or ballpoint needle for zigzag overlocking, especially if you’re working with thick or tough fabrics. These needles are designed to handle the demands of zigzag stitching and provide clean, even results.
Will zigzag overlocking work for all types of fabric?
Zigzag overlocking is suitable for a wide range of fabrics, including woven and knit materials. However, for very delicate or sheer fabrics, you may need to adjust the stitch settings to ensure a clean finish without puckering or distorting the fabric.
Can I backstitch when using the zigzag stitch for overlocking?
While backstitching is commonly used at the beginning and end of a straight seam, it’s not typically necessary when using the zigzag stitch for overlocking.
Instead, you can overlap the starting and ending stitches slightly to secure the thread and prevent unraveling.
Conclusion
Congratulations! You’ve unlocked the secret to using the zigzag stitch as an overlocking technique. This versatile skill opens up a world of possibilities in your sewing projects, allowing you to achieve professional-quality finishes without the need for a dedicated serger.
By mastering the art of zigzag overlocking, you’ve gained the ability to create clean, fray-resistant edges on a wide range of fabrics.
Whether you’re hemming garments, crafting home decor items, or embellishing your DIY creations, this technique adds a touch of sophistication and longevity to your work.
As you continue to refine your sewing skills, remember that practice is key. Experiment with different fabrics and stitch settings to achieve the perfect overlocked edge for each project.
So, go ahead and embrace the creative freedom that zigzag overlocking offers. Elevate your sewing projects, and revel in the satisfaction of turning raw edges into professional, polished masterpieces.
Leave a Reply